CS 6-8 : Save or Score
LEGO Education Computer Science & AI
Save or Score
Build a goalie, a kicker, and a puck, then use a variable to tell your goalie where to move to block the shot.
What You Will Learn
A variable is like a box that holds information. You give the box a name, like x, y, or today’s variable, position. Then you can store a value in it, change that value, and use it anywhere in your program. A variable can hold a number, a word, or a letter. Today, your box holds a number.
Instead of rewriting your code every time you want something different to happen, you change what’s in the box, and the code uses the new value.
In the real world
Robot arms in car factories, like the BMW plant near Mr. Spratt in Greenville, South Carolina, are programmed by engineers to move to exact positions to hold a car door, place an engine, or put in bolts. Video games use variables too, to keep track of things like your score.
Today you will:
- Build a goalie, a kicker, a puck, and a color board.
- Create and use a variable called position.
- Change a variable’s value by scanning colors with the color sensor.
- Play a game where the goalie tries to block the kicker’s shot.
Background
Have you ever heard of a goalie? Lots of sports have one:
- Soccer
- Hockey
- Lacrosse
A goalie’s job is to protect the goal. They try to stop the other team from scoring and keep the ball or puck out of the net. Today you’ll build a goalie and play a game, on your own or with a partner. One person controls the goalie, and the other controls the kicker, the robot taking the shot.
The big question
How does a goalie decide where to move? Where in the goal would a goalie want to stand? Your goalie could stay in the center, move to the left, or move to the right. Those are different positions, and you’ll use a variable to choose between them.
Build It
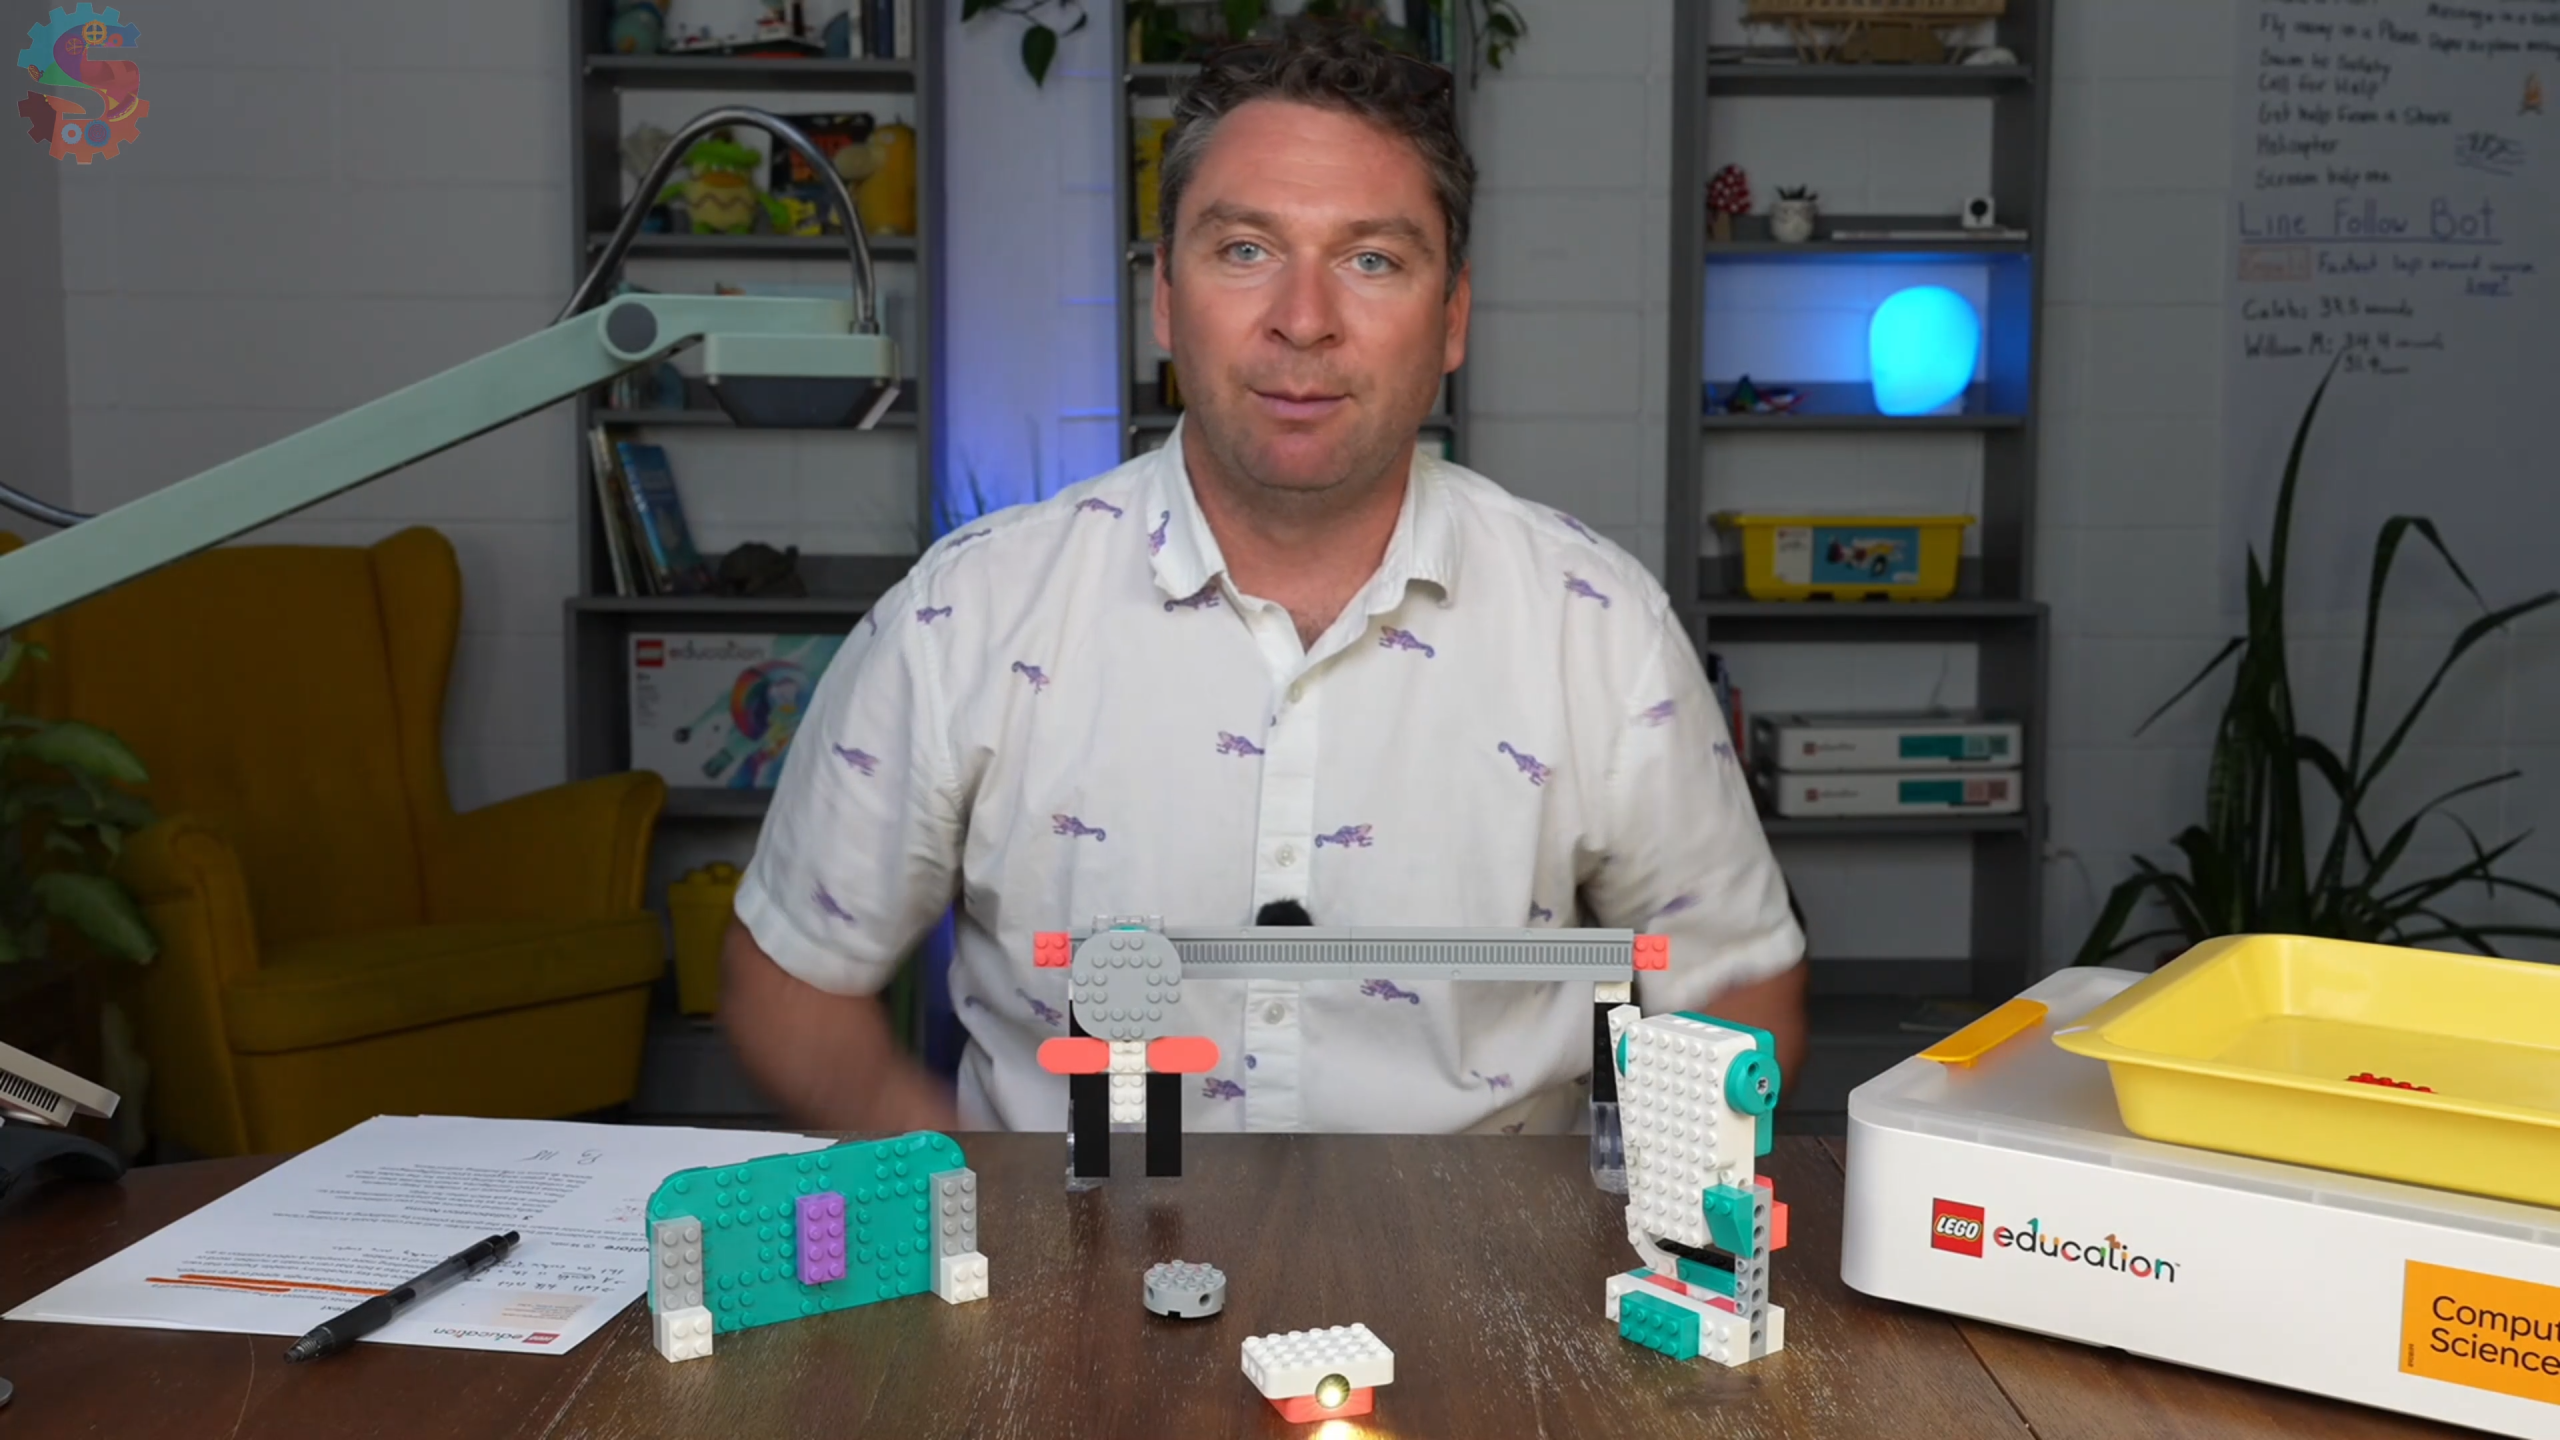
You are building four things: a goal with a track, a goalie that slides along the track on the single motor, a kicker with a hockey stick on the double motor, and a puck. You’ll also start a color board that tells your goalie where to go.
You will need
- LEGO Education Computer Science & AI kit
- Building instructions, pages 118–125
- The single motor, the double motor, and the color sensor
- A computer with a keyboard (you’ll use the arrow keys)
Watch out for these
This build doesn’t give you completely step-by-step directions. You need to look at a picture and build what you see. Lay out your pieces so they look just like the picture.
- 1Share the work. On a team, lay out the colored characters to decide who builds what. On your own, follow along with Mr. Spratt.
- 2Figure out the order. For the goal frame, lay the two tracks down upside down first. Hold them together with a pink piece, add a pink piece on either side, and tie it all together in the middle with gray plates.
- 3Hunt for the white leg pieces. The goal’s legs use white pieces that are hard to find. There seem to be only two, but they are in there. Take out some of the big pieces first so you don’t get mixed up while you look.
- 4Build on a flat surface so you can press everything down nice and hard and the pegs fit together easily.
- 5Stand the goal up. The blue and clear pieces go on the ground, and the white pieces fit right in the middle of the pink pieces. The bit of pink hanging off each side guides your goalie onto the track later.
- 6Build the goalie (pages 122–123). The gray axle on the single motor goes through the clear gearbox, into the tan gear, and out the other side. The round piece with the white peg holds it in place. Then slide your goalie onto the track. It should slide all the way across.
- 7Build the puck. Lay the round piece upside down and attach a smooth skid plate to it.
- 8Build the kicker (pages 124–125). Turn the double motor so the wheels face away from you. Put the hockey stick together, then plug it into the left wheel. At step 9, turn it around to finish the back.
- 9Missing a piece? If you can’t find one of the turquoise pieces, check whether it’s stuck on the bottom of something else.
- 10Start your color board. It begins with just one color, a purple brick. You’ll add more colors to it as you code.
Check it
Slide your goalie along the track from one side of the goal to the other. Set the puck on the kicker’s base and give the stick a push. It should swing and send the puck flying. If the motor keeps spinning after you turn it, hold it still and it will stop.
Coding
Connect your game
- 1Go to code.legoeducation.com and enter PIN 1316. Check that the page says Save or Score.
- 2In a classroom with lots of kits, continue with a connection card. At home, you can continue without a card. Skip the instructions.
- 3Connect the single motor: turn it on, press the button one more time until it beeps, and click pair.
- 4Connect the double motor and the color sensor the same way.
The starter code
The program starts with two stacks.
| Color stack | What it does |
|---|---|
| when purple detected | An event. It runs when the color sensor sees purple. |
| set position to 1 | Puts the number 1 in the variable called position. |
| Game stack | What it does |
|---|---|
| when any arrow key pressed | An event. It runs when you press left, right, up, or down on your keyboard. |
| run ↻ for 1 rotations | Turns the single motor one rotation, which slides the goalie along the track. |
| run left motor ↺ for 1 rotations | Turns the double motor’s left motor, which swings the hockey stick and kicks the puck. |
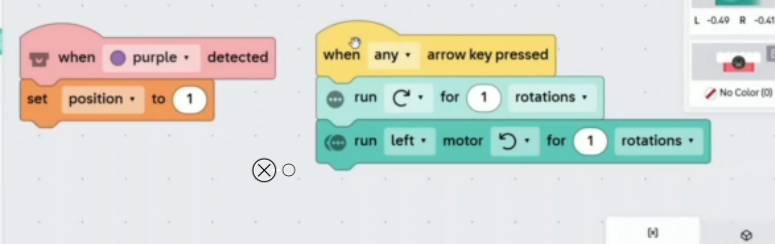
Pressing Play doesn’t do anything by itself, because nothing in this code is waiting on the Play button. The code waits for purple to be detected or for an arrow key to be pressed. Also notice that one arrow key press runs both motors. There’s no “or” in there.
Set up the field
Use your color board as a measuring stick to keep things fair: put the kicker one color board length away from the goal. Set the puck on the kicker’s base, and aim the kicker at the middle of the goal. Slide the goalie all the way to the left side of the goal.
Try it
- 1Press Play, then press an arrow key. The goalie moves, and the kicker kicks. If the goalie falls off, just reattach it.
- 2Slide the goalie to the middle, so the gear lines up with the middle pink area. Change the 1 in “run ↻ for 1 rotations” to -1 and press an arrow key. Now the goalie moves the other direction.
- 3Changing the code every time is slow. Use the variable instead: from the orange data blocks, drag position into the single motor block, so it reads “run ↻ for position rotations.”
- 4Hold the color sensor up to purple. Look in the bottom right corner of the screen. The value of position changes.
- 5Add more options. Grab red and yellow bricks and add them to your color board. Change purple to 0. Then right-click the purple stack, copy it, and paste it twice. Set yellow to 1 and red to -1.
- 6Hold the color sensor up to each color and watch the position variable change. Scan purple, put the puck in place, and press an arrow key. The goalie stays in the middle and blocks the shot!
Positions in the goal
Think of the goal as having positions: 0 is the middle, 1 is one spot to one side, and -1 is one spot to the other side. The number tells the goalie how many rotations to move from where it is now. If the goalie starts in the middle and you send it 1, it moves one spot over. If it starts all the way on one side, the same 1 might bring it back to the middle.
Which way is left?
Left and right depend on whose point of view you’re using. When Mr. Spratt faces the goalie from the kicker’s side, a positive number moves the goalie to his left and a negative number moves it to his right. If you stood behind the goal like a real goalie, it would be the opposite. The colors don’t mean left or right; they tell the goalie which position to go to. Decide with your partner whose view you’re using.
Play Save or Score
- 1Place the kicker and goalie. The kicker chooses a spot, and the puck goes on the kicker’s base.
- 2The goalie scans a color. The goalie keeps the color board hidden from the kicker and scans one color to tell the goalie where to go.
- 3Press an arrow key. The goalie moves, and then the kicker kicks. Did you save it, or did they score?
Play with a partner, a parent, or a family member, or go against yourself.
Check it
When you scan a color, the position value in the bottom right corner changes to match. When you press an arrow key, the goalie moves that many rotations, and the kicker kicks.
The Challenge
If your goalie is on the far side of the goal and the kicker sets up on the other side, moving just one rotation won’t get the goalie there in time. Give your goalie more positions to choose from.
Code it: more positions
Add a few more events that watch for colors and change your variable by more, like 2 or -2, so your goalie can move farther across the goal.
- 1Pick new colors the color sensor can detect, like blue, teal, green, or white, and add them to your color board. (Pink isn’t an option.)
- 2Add an event for each new color that sets position to a new number.
- 3Test each color and watch the position value change.
- 4Put the goalie on one side of the goal and the kicker on the other. Can your goalie get all the way across?
Hint
Right-click a color stack you already have, copy it, and paste it. Then change the color and the number.
Build it better: suit up
Build a jersey for your goalie and your kicker. Give them some add-ons and more character. Mr. Spratt gave his goalie eyeballs and teeth with its tongue hanging out, because goalies are usually pretty wild.
Hint
Keep add-ons light and out of the way so the goalie can still slide and the stick can still swing.
Organize your code
Line up your color stacks in order, from one side of the goal to the other. Then add a comment to remind yourself which way positive and negative numbers move the goalie from your point of view.
Save your project: on the code screen, click Save or Score, then Save project. It downloads to your computer so you can reuse it or show it to someone else.
You know it works when
Your goalie can start on one side of the goal, get to the other side after a scan, and block the shot.
Think About It
- 1What happened? What changed when you switched the number in the motor block from 1 to -1? What changed when you replaced the number with the position variable?
- 2Why? Why is using a variable and a color board easier than changing the number in your code before every shot?
- 3Real world: Back to the big question: how does a real goalie decide where to move? What information are they “storing” and changing during a game?
Extension Challenge
Add another variable
Your goalie has a variable. What about the kicker? Create a new variable that controls something about the kicker, like how fast the kicker kicks or what position the kicker puts its arm in between kicks. Add more events that change it.
Then challenge somebody to play against you. The kicker sets up, the goalie scans a color from the color board, and you press an arrow key to run the program.
Parent Overview
What we learned
A variable is like a box that holds information. The program can store a value in it, change it, and use it later, so the same code can do different things.
What we did
Your child built a goal, a goalie on a track, a hockey-stick kicker, a puck, and a color board from building instructions pages 118–125. At code.legoeducation.com (PIN 1316), they created a variable called position. Scanning a color sets the variable, and pressing an arrow key moves the goalie that many rotations before the kicker shoots. Then they played a game where the goalie tries to block the shot.
They’ve got it when you see
- They scan a color, and the position value on screen changes.
- They can tell you which color sends the goalie which way, and from whose point of view.
- They add a new color that sets a new position.
- Their goalie blocks a shot because of the color they chose.
If they’re stuck
- Nothing happens when they press Play: That’s expected. The code waits for a color to be scanned or an arrow key to be pressed.
- The goalie goes the wrong way or not far enough: The number tells the goalie how far to move from where it starts. Check where the goalie started and which way you’re looking at the goal from.
- The position value doesn’t change: Make sure the color they scan matches a color in their code. If they swapped bricks on the color board, update the code to match.
- The goalie falls off the track: Slide it back on using the pink pieces on each side of the goal as a guide.
- The motor keeps spinning after they turn it by hand: Hold it still and it stops.
- A piece seems to be missing: The two white leg pieces are hard to find, and pieces can get stuck under others. Take out the big pieces and look again.
Challenge answers
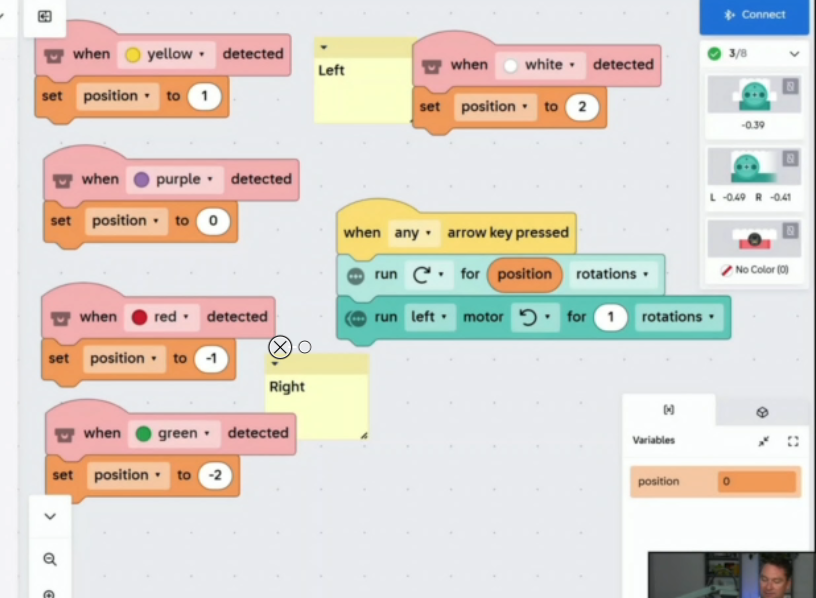
Here is the program from the video. Each color sets the position variable:
| Block | What it does |
|---|---|
| when white detected: set position to 2 | Moves the goalie two spots (added in the challenge). |
| when yellow detected: set position to 1 | Moves the goalie one spot. |
| when purple detected: set position to 0 | The goalie stays still. |
| when red detected: set position to -1 | Moves the goalie one spot the other way. |
| when green detected: set position to -2 | Moves the goalie two spots the other way (added in the challenge). |
| when any arrow key pressed | Starts the play. |
| run ↻ for position rotations | Moves the goalie using the variable. |
| run left motor ↺ for 1 rotations | The kicker kicks. |
Mr. Spratt ordered the color stacks from one side of the goal to the other and added comments: “Left” beside the positive numbers and “Right” beside the negative numbers, from his view facing the goalie. Any colors and numbers work, as long as the goalie can reach more spots in the goal.
- Build it better: Any jersey or add-on counts, as long as the goalie still slides and the kicker still swings.
Standards connection
- CSTA 2-AP-11: Create clearly named variables that represent different data types and perform operations on their values.
- CSTA 2-AP-12: Design and iteratively develop programs that combine control structures.
- CSTA 2-AP-17: Systematically test and refine programs using a range of test cases.
- CSTA 2-AP-19: Document programs in order to make them easier to follow, test, and debug.