CS 6-8: Art Designer
LEGO Education Computer Science & AI
Art Designer
Build an art machine that draws with a marker, then use a function and its parameter to create your own geometric artwork.
What You Will Learn
Today you’ll learn about functions. A function is a named block of code you can run again and again. You define it once, then call it by name whenever you need it. Programmers use functions so they don’t repeat themselves: if the same steps happen many times, write them once and reuse them. That also means a fix made inside the function fixes every place it’s used.
A function can take a parameter: information passed to the function to customize it. A parameter works like a variable, but its value is filled in each time the function is called. The value you send in the call is called the argument. In drawing arm (0.5), the argument is 0.5, and inside the function the parameter number of rotations holds that 0.5.
In the real world
In a video game, a “jump” function might check if the player is on the ground, check which way they’re facing, and push them up into the air. That could be five to ten pieces of code. With a function, the game just calls “jump” every time you press the space bar or the A button.
Today you will:
- Build an art machine that holds a marker and draws.
- Explain what a function is and what a parameter does.
- Fix a bug so the function uses its parameter correctly.
- Call a function many times with different parameters to make geometric art.
Background
Big question
How can we use a machine to make art?
Human artists make decisions every time they create. They decide what they’re going to make and how they’re going to make it. Some art is made by hand, and some is made using a computer.
If a robot is going to make art, we have to give it instructions. We’ll teach it how to move a pen or a marker. Then we’ll let it do that over and over and over again, changing just one parameter each time.
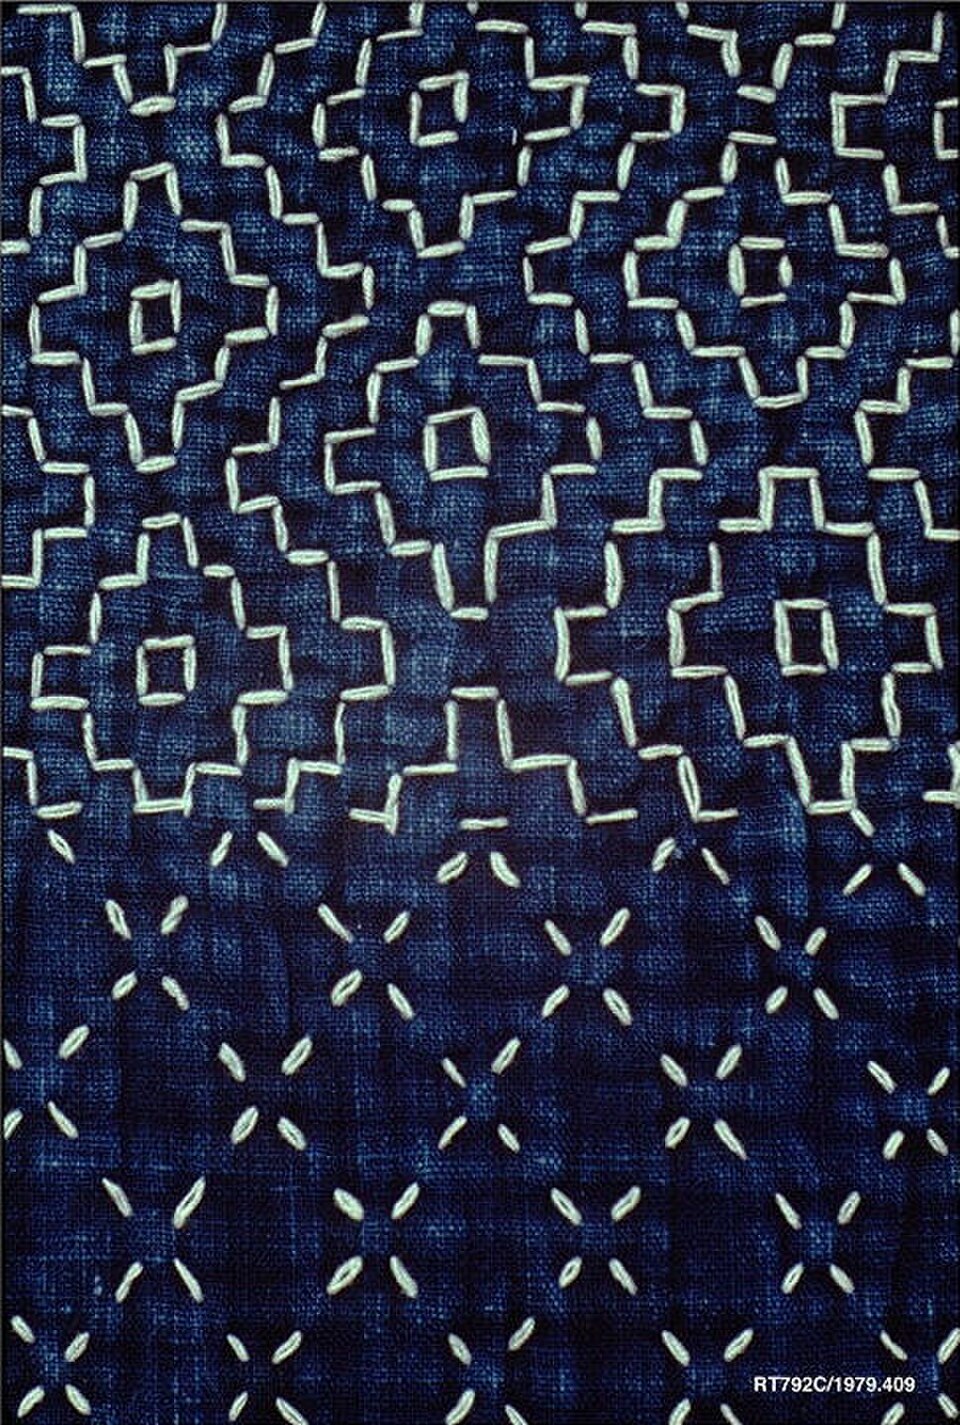
That’s how geometric art works. It uses shapes over and over again, with small changes throughout the artwork. One beautiful example is Sashiko, a Japanese art form of delicate embroidery. The artist makes the same shape over and over to create a pattern.
Today, your robot becomes the artist.
Build It
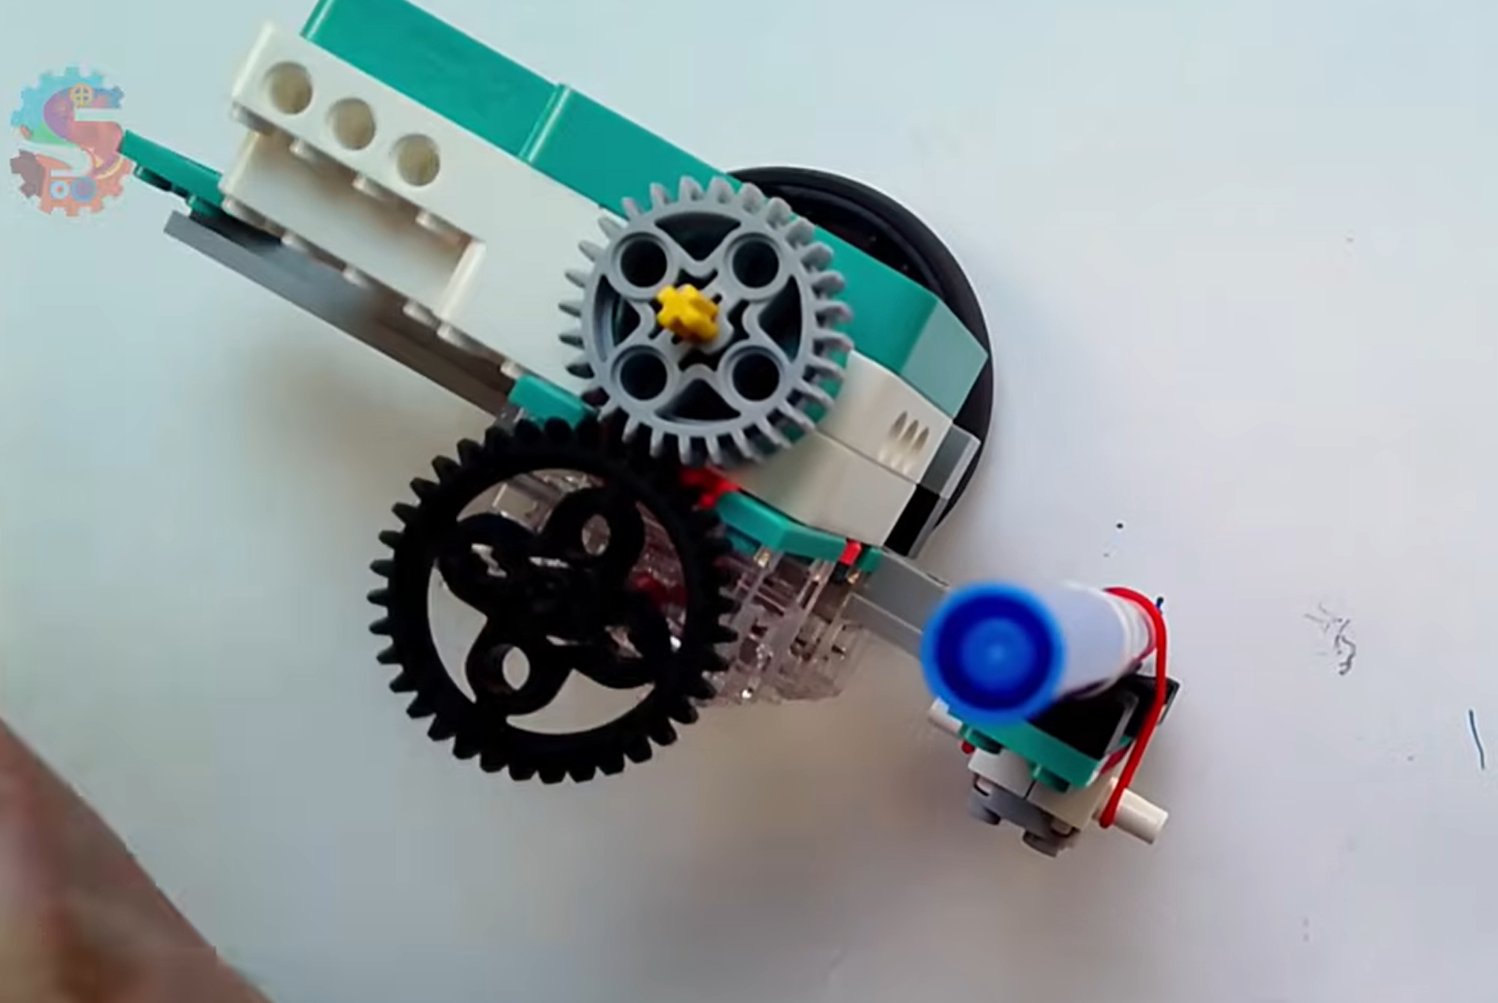
You are building an art machine: a robot that spins on a big wheel while its arm slides in and out, pulling a marker across the paper.
You will need
- LEGO Education Computer Science & AI kit
- Building instructions, starting on page 170
- The double motor, fully charged
- A washable marker. Mr. Spratt uses thin Crayola markers. A pen also works, but a pencil doesn’t show up well.
- A rubber band (the red one in the kit, or any rubber band)
- Blank paper, plus something to protect your table
Careful
This is a messy lesson! Use a washable marker, or put something under your paper. Markers can bleed through.
Watch out for these
- 1Read the pictures. The book shows the main parts, not every single step. Look carefully and work out a couple of steps at a time. Pause the video whenever you need to.
- 2Build the color pieces first. Each color in the book (blue, red, green, yellow) is one builder’s job. Build each one and set it aside before you put everything together.
- 3Be gentle before it’s locked in. Once the double motor is on, turning the gray gear should turn the gears beside it. Nothing is locked into place yet, so handle it carefully.
- 4Push the axle all the way through. After you add the second gearbox, slide the axle in until none hangs out the other side. You might have to pivot it a little to fit onto the pink axle extension.
- 5Check the sloped piece. Under the teal piece with two white pins, leave two studs hanging out. The slope should run toward the white pins. Mr. Spratt had it backwards at first!
- 6Don’t forget the wheel. Attach the big wheel and the pink piece with two dots before you slide the arm into the clear gearbox.
- 7Add the stop piece. Push the arm all the way in, then attach the stop piece with three studs hanging off the end. It keeps the arm from sliding out the back.
- 8Attach the marker. Take the rubber band off first. Uncap the marker, stand it in the holder, and lower it until it just presses on the paper. Then wrap the rubber band around it to hold it still.
Check it
Gently turn the gray gear by the motor. The other gears should turn all the way over to the tan gear. Push the arm all the way in. The marker tip should touch the paper without bending.
Coding
Connect your art machine
- 1Go to code.legoeducation.com and enter PIN 1323. Check that the page says Art Designer, then click Start.
- 2Click Continue without a card.
- 3Click Double Motor. Press the motor’s button once to turn it on, then once more to put it in Bluetooth mode.
- 4Listen for the beep that means it’s paired. You’ll see the double motor in the top right corner of your screen.
- 5Put paper under the robot. Push the arm all the way in, and check that the marker touches the paper.
The starter code
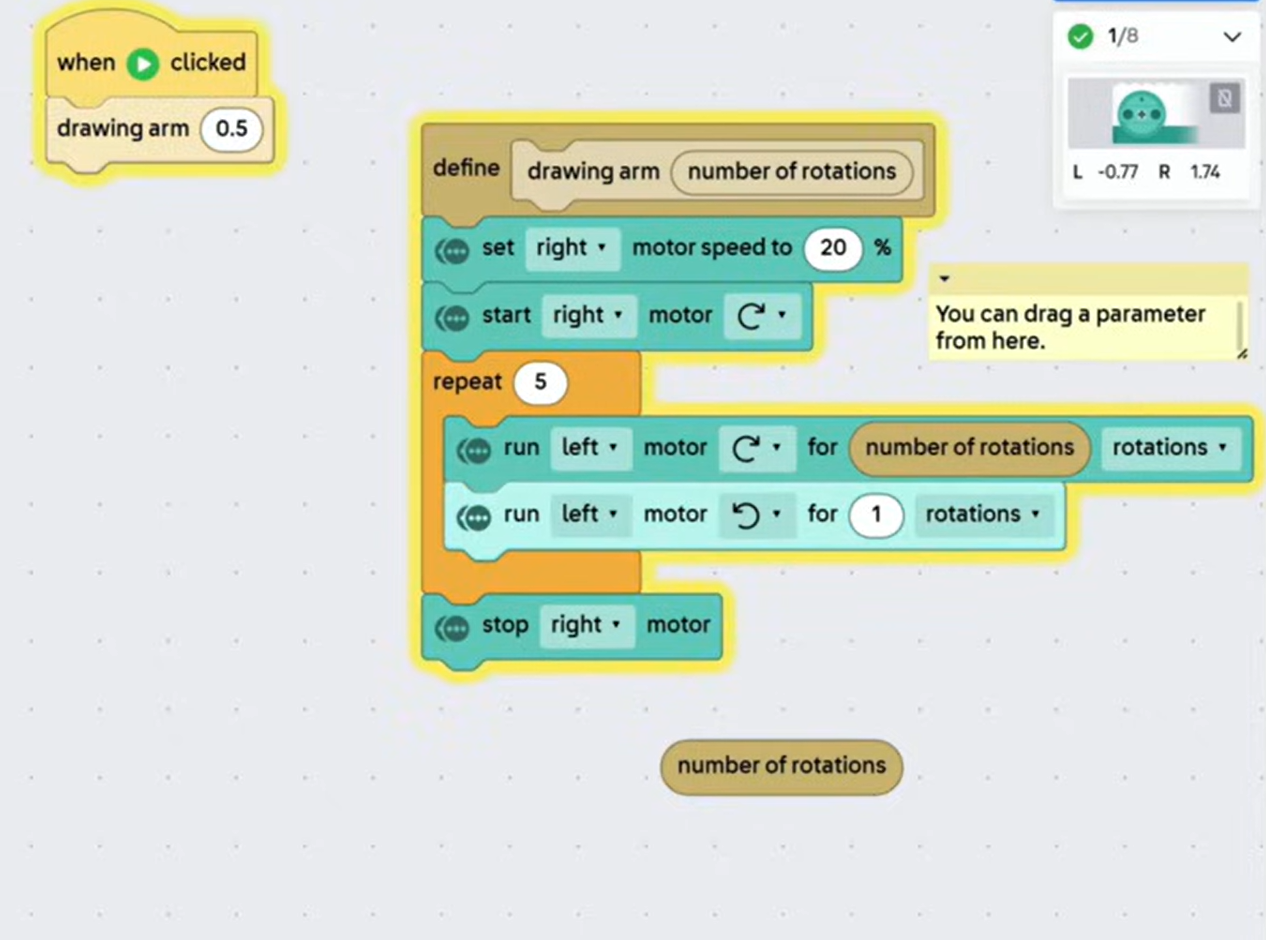
The starter code has two stacks. The yellow stack calls the function. The brown define stack is the function itself.
| Start stack | What it does |
|---|---|
| when ▶ clicked | Starts the program when you press Play. |
| drawing arm 0.5 | Calls the drawing arm function and sends it the argument 0.5. |
| Function stack | What it does |
|---|---|
| define drawing arm (number of rotations) | Defines the function. Inside it, “number of rotations” holds whatever number was sent in the call. |
| set right motor speed to 20 % | Sets how fast the robot spins. |
| start right motor ↻ | Starts the whole robot spinning on its wheel, and keeps it going. |
| repeat 5 | Runs the arm’s in-and-out motion five times. |
| run left motor ↻ for (number of rotations) rotations | Inside the loop: slides the arm out. |
| run left motor ↺ for 1 rotations | Inside the loop: slides the arm back in. Watch this one! |
| stop right motor | Stops the spinning when the art is done. |
Notice that the two motors do different jobs at the same time. start right motor keeps the robot spinning without waiting, while the run left motor blocks finish one move before the next starts. Together they turn a straight in-and-out motion into a looping design.
Try it
- 1Press Play and listen. Something sounds wrong! The arm goes out 0.5 rotations but comes back 1 full rotation. It tries to go farther than it physically can, so the gears grind and get stuck.
- 2Fix the bug. Drag the number of rotations parameter from the define block into the second run left motor ↺ block, replacing the 1. Now the arm goes out and comes back the same distance every time.
- 3Press Play again. If the marker pokes a hole in the paper, raise it up just a little.
- 4Change the parameter. Press Stop, then change the 0.5 in the call block to a different number, like 0.1, 0.75, or 1. Use a new sheet of paper for each try so you can compare. Mr. Spratt found that about 1.5 is the farthest the arm can go before the gears jam.
Check it
The robot spins in a circle while the arm slides in and out, drawing a wavy loop with no grinding noises. Small numbers make little squiggles. Bigger numbers make the arm reach much farther out.
The Challenge
The whole point of making a function is that you can call it over and over again with different parameters. Can you turn one small drawing into a bigger piece of artwork?
Code it: call the function many times
Change your program so it calls drawing arm five times. Give each call a different number so the design starts tiny and gets bigger as it goes.
Hint
Duplicate the drawing arm call block and snap the copies together under when ▶ clicked. Then give each one a bigger number than the one before.
Build it better: make a layered design
Run your program again on the same paper, but change something about the robot first. Try a new marker color, a new starting angle, or a different starting arm position.
Hint
Fold your paper in half to find the middle. Before you press Play, press Stop, put the robot back in the middle, and turn it a little.
You know it works when
Your robot runs the function five times in a row without you rewriting any code, starting with teeny tiny lines and finishing with big loops. Your second color lands in a new spot and builds a layered, spiral-graph-style design.
Think About It
- 1What happened? How did changing the argument you passed to drawing arm change your pattern? Describe what small values (like 0.1) and large values (like 1 or 1.5) produced, and explain why in terms of what the left motor was doing.
- 2Why? The starting bug came from a hard-coded value (the 1) sitting where the parameter belonged. Why do hard-coded values inside a function cause problems? How would that bug have grown if you called the function five times without fixing it?
- 3Real world: Think of an app, game, or website you use. What is something it does over and over that is probably a function? What parameters might that function take?
Share it: Leave Mr. Spratt a message. How does using a function help us in computer science? What does it stop us from having to do?
Extension Challenge
Design a gallery series
Make three pieces of art that belong together, like an artist’s collection:
- Let the computer choose. In the green Operators section, find pick random. Drop it into each drawing arm call so every drawing is a surprise. Keep the numbers in a range the arm can actually reach.
- Repeat more. Change repeat 5 inside the function to repeat 10 and see how much fuller the design gets.
- Change the start. Try starting the arm all the way out, in the middle, or all the way in. How does each start change the shape?
- Layer colors. Use two or three marker colors on one page, turning the robot a little between runs.
Write down the numbers you used for each piece so someone else could make the same art. Which piece is your favorite, and which parameter made the biggest difference?
Parent Overview
What we learned
A function is a named set of instructions a program can reuse as often as it likes. A parameter is a number you hand the function to change what it does each time.
What we did
Your child built an art machine from building instructions starting on page 170. It spins on a wheel while an arm slides a marker in and out. At code.legoeducation.com (PIN 1323), they fixed a bug in the starting code, then called the drawing function many times with different numbers to create geometric art.
They’ve got it when you see
- The robot spins and draws loops with no grinding or clicking.
- They can explain that changing the number in drawing arm changes how far the arm reaches.
- Their program calls drawing arm several times, and the design gets bigger with each call.
If they’re stuck
- The gears grind or click: The arm is going farther in one direction than the other. Check that both run left motor blocks use “number of rotations,” not 1. Also keep numbers at 1.5 or below.
- The marker pokes holes or tears the paper: Raise the marker a little in its holder.
- No line shows up: Lower the marker until it presses on the paper, and push the arm all the way in before starting.
- The motor won’t connect: Make sure it’s charged. Press the button once to turn it on, then again for Bluetooth, and listen for the beep.
- There’s marker on the table: Use washable markers and put something under the paper.
Challenge answers
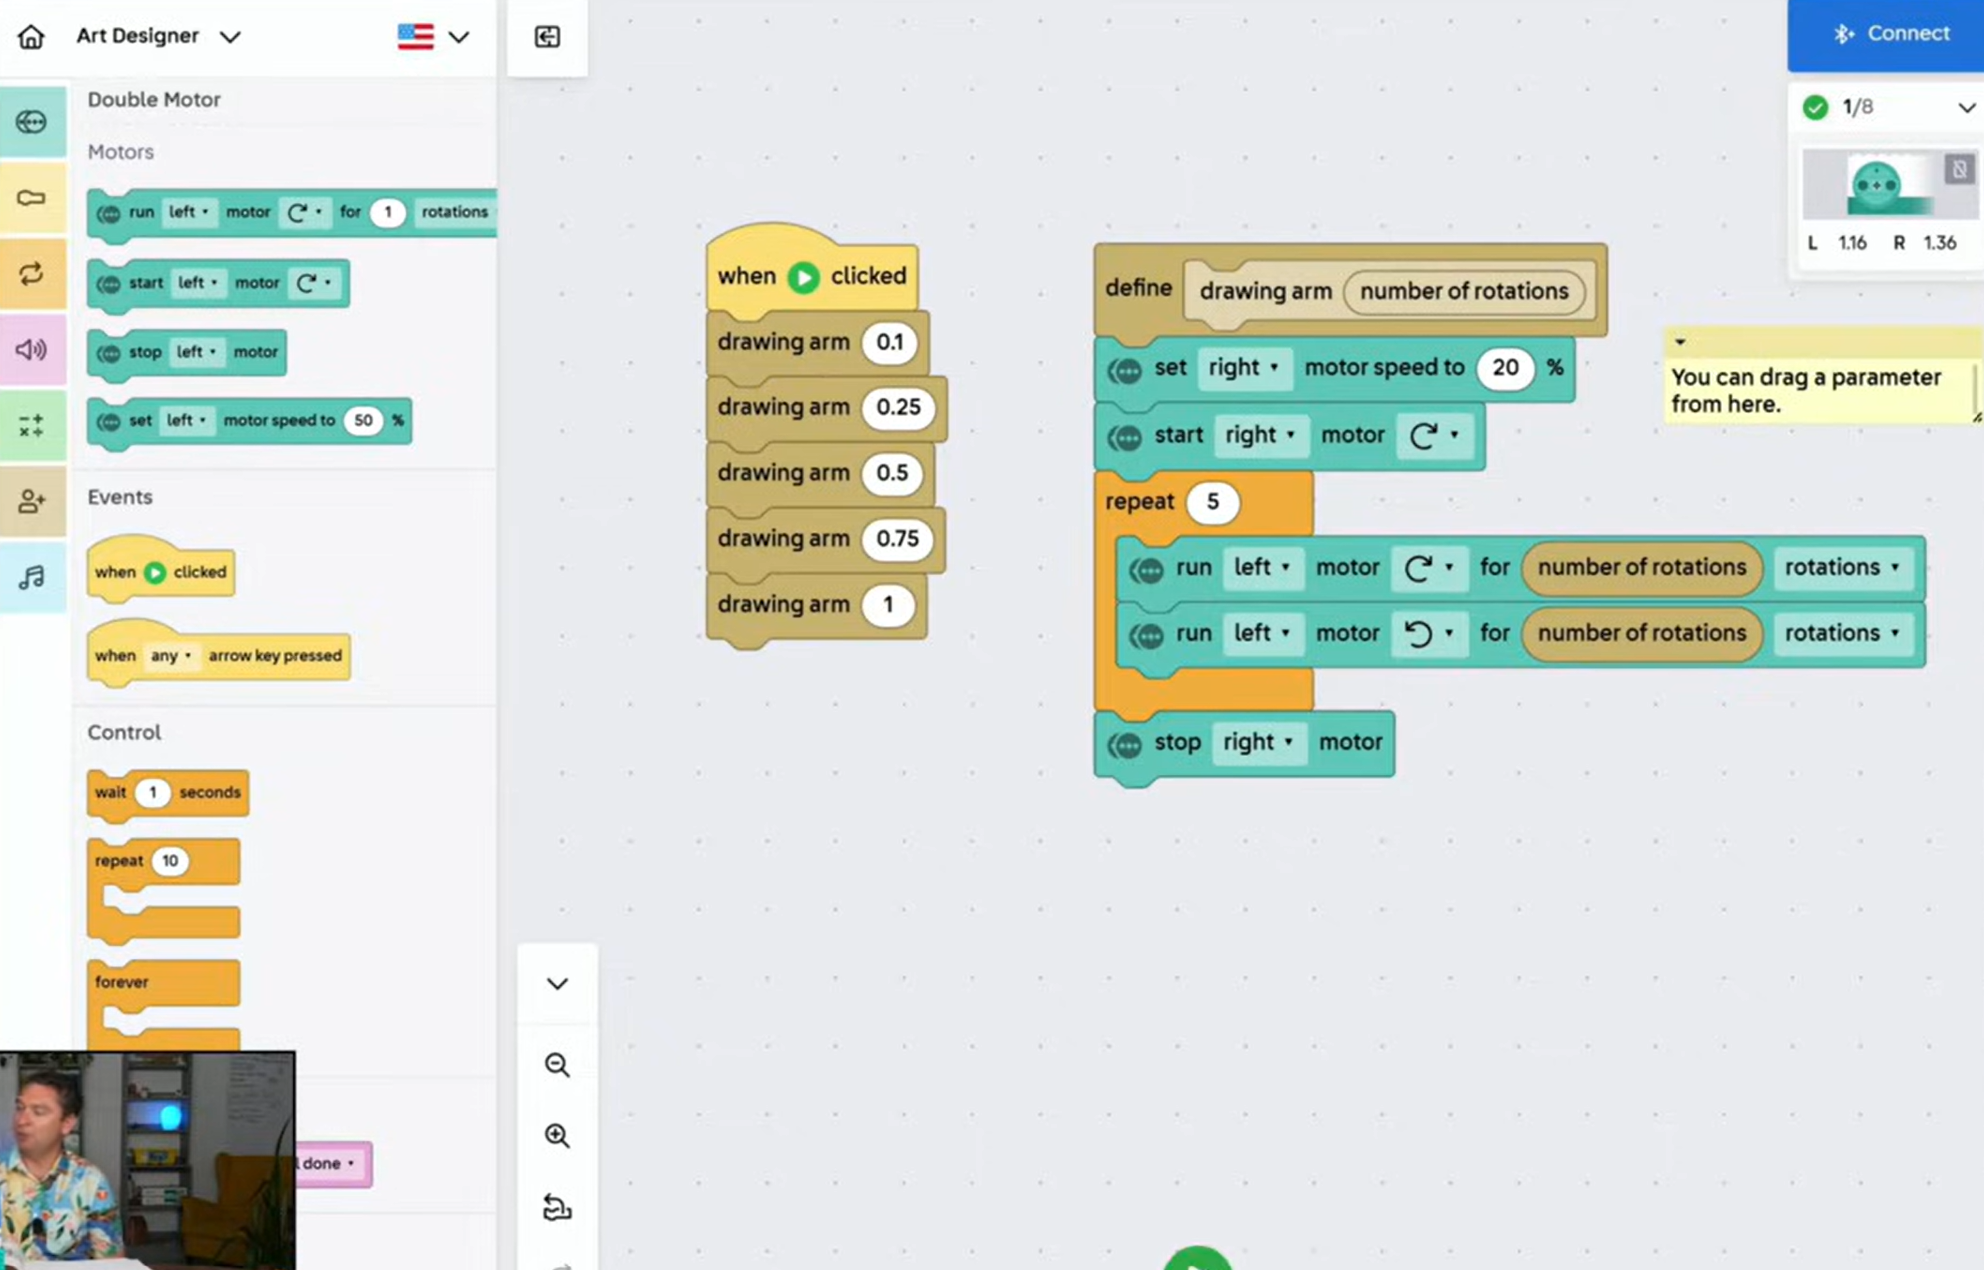
Here is Mr. Spratt’s program for calling the function five times:
| Block | What it does |
|---|---|
| when ▶ clicked | Starts the program. |
| drawing arm 0.1 | Teeny tiny squiggles. |
| drawing arm 0.25 | A little bigger. |
| drawing arm 0.5 | Medium loops. |
| drawing arm 0.75 | Bigger loops. |
| drawing arm 1 | The biggest loops. |
The function stays the same, with “number of rotations” in both run left motor blocks.
- Build it better: Change the marker color, put the robot back in the middle of the paper, turn it slightly, and run the same program again.
- Extension (pick random): Put a pick random 0.1 to 1.5 block into each drawing arm call.
Standards connection
- CSTA 2-AP-14: Create procedures with parameters to organize code and make it easier to reuse.
- CSTA 2-AP-17: Systematically test and refine programs using a range of test cases.
- CSTA 2-AP-13: Decompose problems and subproblems into parts to facilitate the design, implementation, and review of programs.
- CSTA 2-CS-02: Design projects that combine hardware and software components to collect and exchange data.