CS 6-8: Level Up
LEGO Education Computer Science & AI
Level Up
Build a live action video game, then use if-then-else conditionals to decide when your player wins and when it’s game over.
What You Will Learn
A conditional is a rule in a program where something has to be true for an event to happen. Today you’ll use an if-then-else conditional. The program checks a condition. If it’s true, then it does one thing. Else (if it’s not true), it does something different.
If-then-else conditionals are how so much programming and computer science happens. They’re how a computer makes a choice depending on what the user does.
In the real world
Video games are full of if-then-else rules. If you fall off a platform or touch spikes, you lose; else, you keep playing. Outside of games, a phone uses the same idea when you unlock it: if the passcode matches, then it opens; else, it stays locked.
Today you will:
- Build a live action video game with two obstacles and a finish line.
- Read an if-then-else conditional and draw it as a flowchart.
- Change the code so the game sends you back to the start when you lose.
- Code an if-then-else conditional for an in-game obstacle.
- Rebuild your character to beat the obstacles.
Background
Think about the rules in video games you’ve played:
- If you fall off a platform, you lose.
- If you touch spikes, you lose.
- If an enemy hits you, you get a game over screen.
- Sometimes the consequence is losing a life or resetting the game.
Every one of those rules is a conditional. Today you’re building a live action video game: a real track on your table, with real obstacles and a real player, the red minifigure riding on your single motor. Just like in the Mario games, there’s a flag at the finish line that marks the end of your level.
The big rule for today
Build your character on the gearbox to make it through the game. There are no buttons to steer with this time. The game’s code sets the obstacles, and the only way to win is to change how your character is built, using your minifigures and 2×4 bricks.
Build It
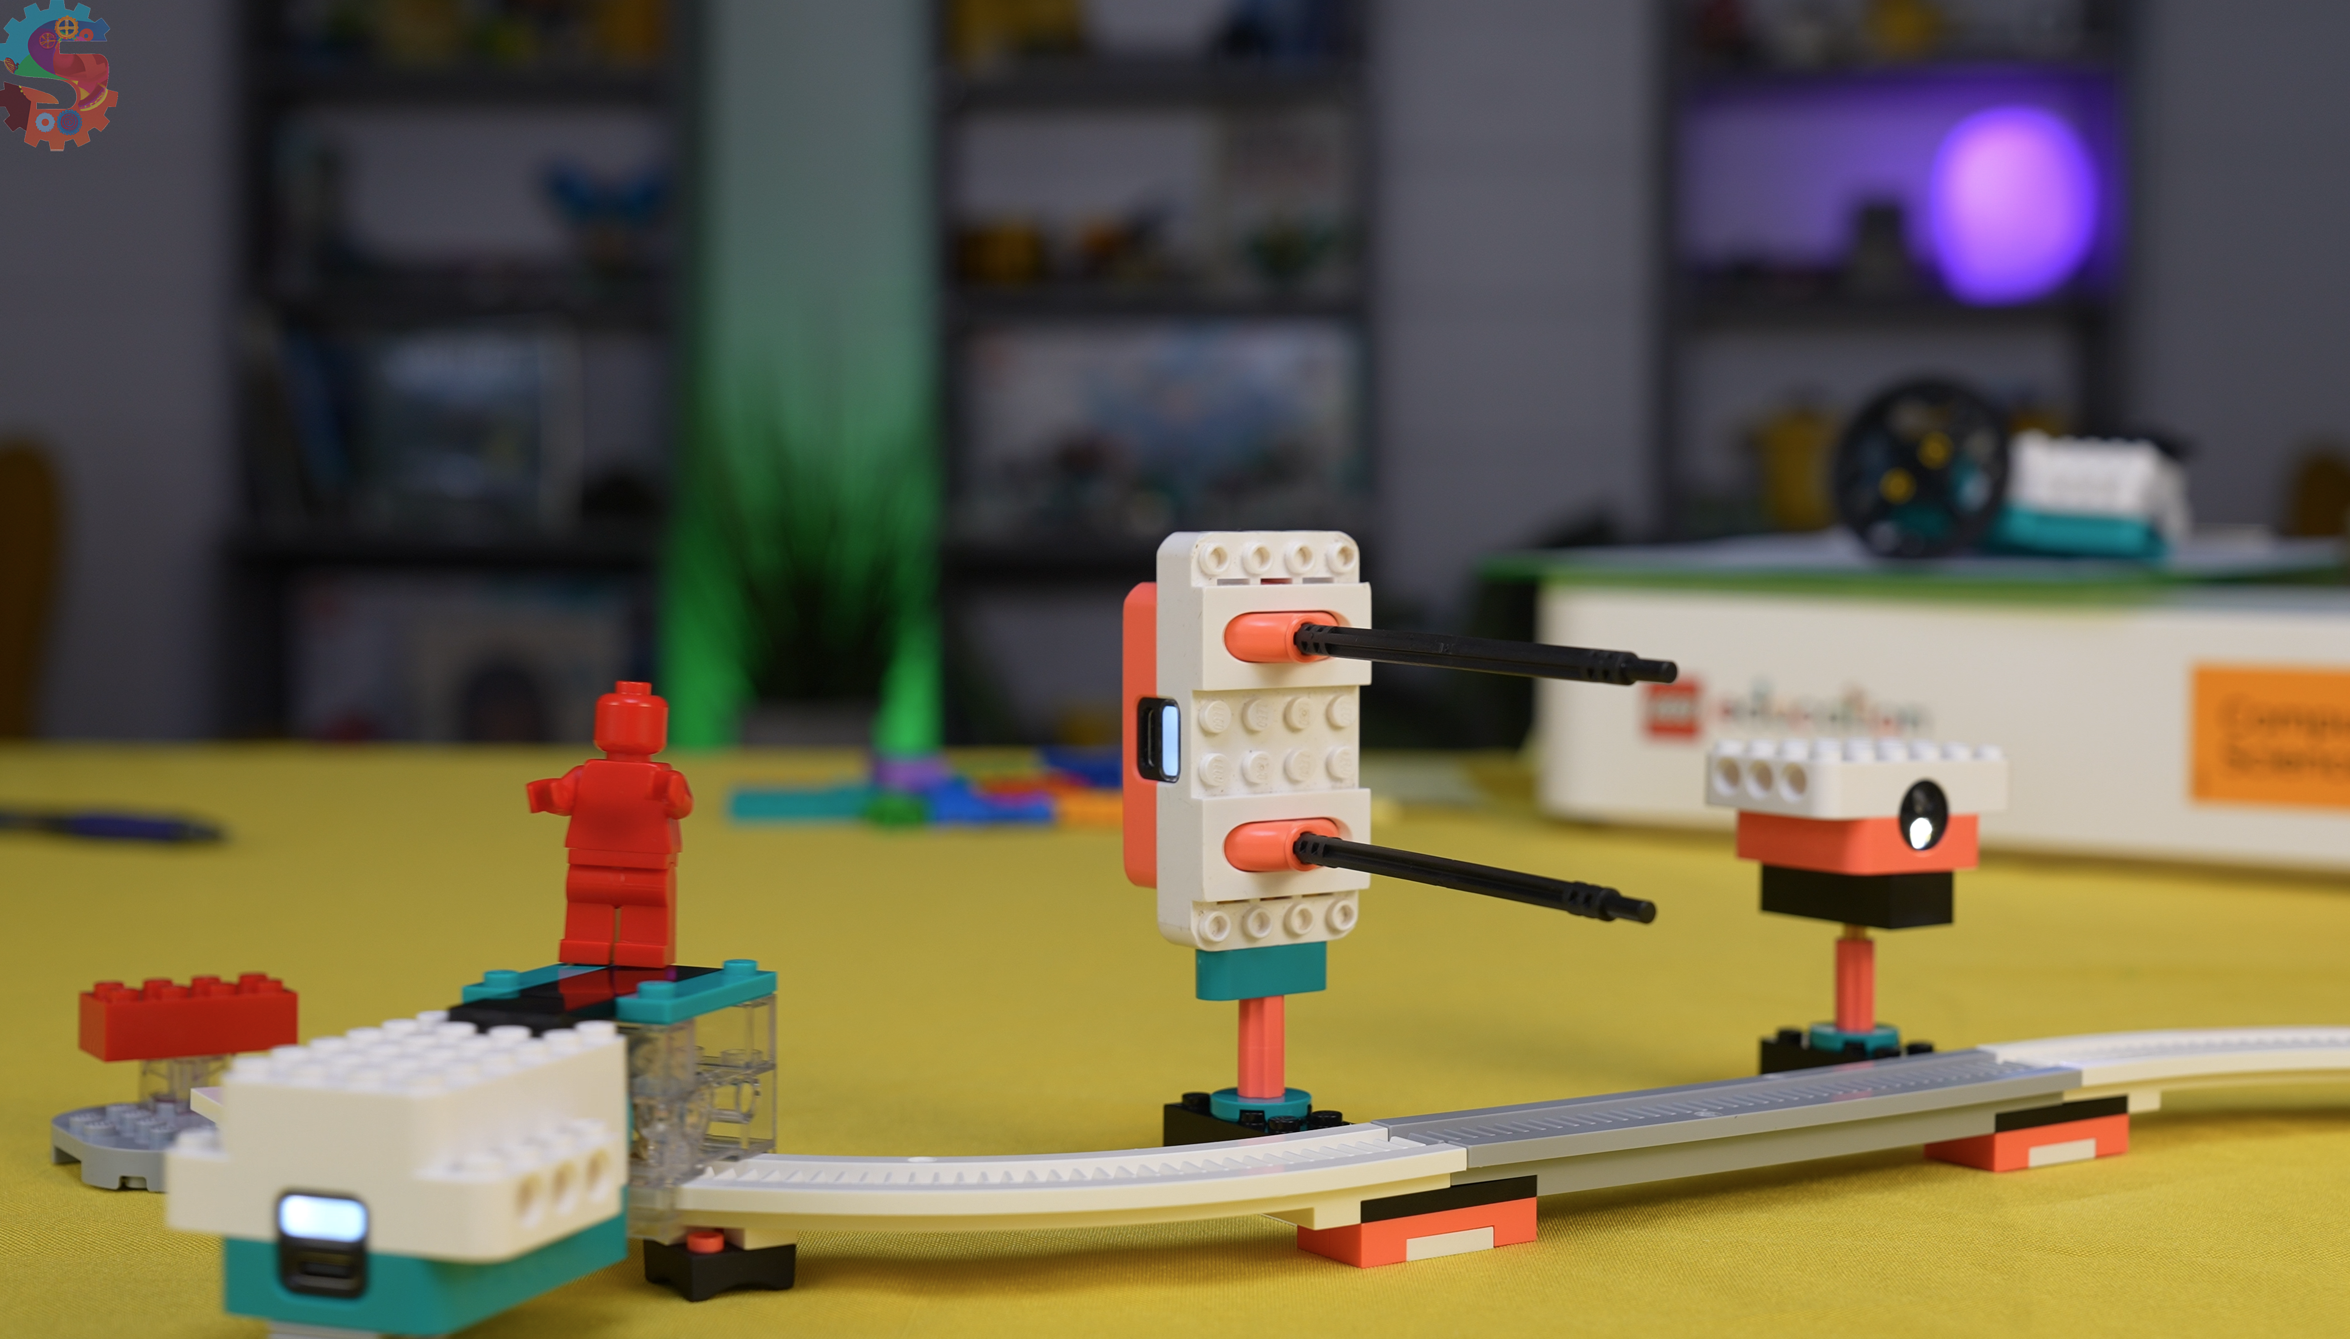
You are building an S-shaped monorail track with a start block, two obstacles (the controller and the color sensor), a finish-line flag, and a player that rides the single motor.
You will need
- LEGO Education Computer Science & AI kit
- Building instructions, page 90 (about 7 minutes to build)
- The single motor, the controller, the color sensor, and the red minifigure. You won’t need the double motor today.
Watch out for these
Follow the building instructions for each step. These are the spots that are easiest to get wrong:
- 1Share the work. On a team, each person takes one minifigure and builds the steps that match its color. In pairs, each person takes two. On your own, build the whole thing.
- 2Lock in the motor attachment. The clear beams, turquoise beams, and long smooth black piece hold the single motor to the track. Once it’s on, you shouldn’t be able to pull it off. Don’t forget the skid plate underneath so the player slides along the table.
- 3Keep the two platforms straight. They look almost the same. One is the starting block (it gets the red 2×4 brick with the clear round piece). The other is the finish line with the flag. Each also gets a grey piece on its end, so check the instructions for that part.
- 4Orient the controller. The two long black pieces are rubber pieces, not axles. Hold the controller so you can see the power button, then flip it over so you can’t. Attach the yellow pins and turquoise piece on the left side.
- 5Mount the obstacles. Both mounts use a mix of pins and axles and finish with the yellow axle pointing up. The pink axle connector only slides in once everything is lined up, so don’t force it.
- 6Build the track base. Push the rubber feet into the middle of the two curved white pieces so the track stays still. In the grey monorail piece, the gap in each pink piece should completely cover the black pieces.
- 7Assemble the S shape. Flip the grey piece over so the white turn curves toward you, and add the flag at that end. The next turn goes away from you. Finish with the starting block and its red platform piece.
- 8Place the obstacles in order. The controller goes on the mount closer to the red start brick. The color sensor goes closer to the finish line, in its very middle hole so it can see anything that passes.
- 9Add the player. Slide the single motor onto the monorail, then press the red minifigure securely onto the platform.
- 10Grab your pieces. Before you put your kit away, pull out all your minifigures and all your 2×4 bricks (green, blue, purple, turquoise, and the two yellow ones). You’ll use them to rebuild your character.
Check it
Slide the single motor by hand from the start block to the flag. It glides the whole way along the monorail without catching, and the track doesn’t shift on the table.
Coding
Connect your game
- 1Go to code.legoeducation.com and enter PIN 1312. Check that the page says Level Up.
- 2In a classroom, pick a connection card and scan it to all your devices so you don’t get mixed up with anybody else’s kit. At home, you can continue without a card. Skip the instructions.
- 3Connect the single motor: turn it on, scan your card, press the button one more time, and click pair.
- 4Connect the color sensor and the controller the same way.
- 5If a device doesn’t show up on the Bluetooth screen, click back, then next.
Know your levers
On the controller mounted on your track, the right lever is the bottom one, and the left lever is the top one.
The starter code
The program starts with two stacks.
| Start stack | What it does |
|---|---|
| when ▶ clicked | Starts the game when you press Play. |
| set speed to 20% | The player moves slowly so you can watch what happens. |
| start motor ↺ | Turns the single motor counterclockwise, moving the player down the track. |
| Controller stack | What it does |
|---|---|
| when right lever is up | The event. Nothing below runs until the player pushes the right lever. |
| wait 2 seconds | Gives the player time to push the levers. |
| stop motor | The player stops at the obstacle. |
| if left lever is up? then | The check. Is the left lever also pushed up? |
| play sound Win until done | Yes: both levers are up, so you win. |
| else | Anything else. |
| play sound Lose until done | No: only the right lever moved, so you lose. |
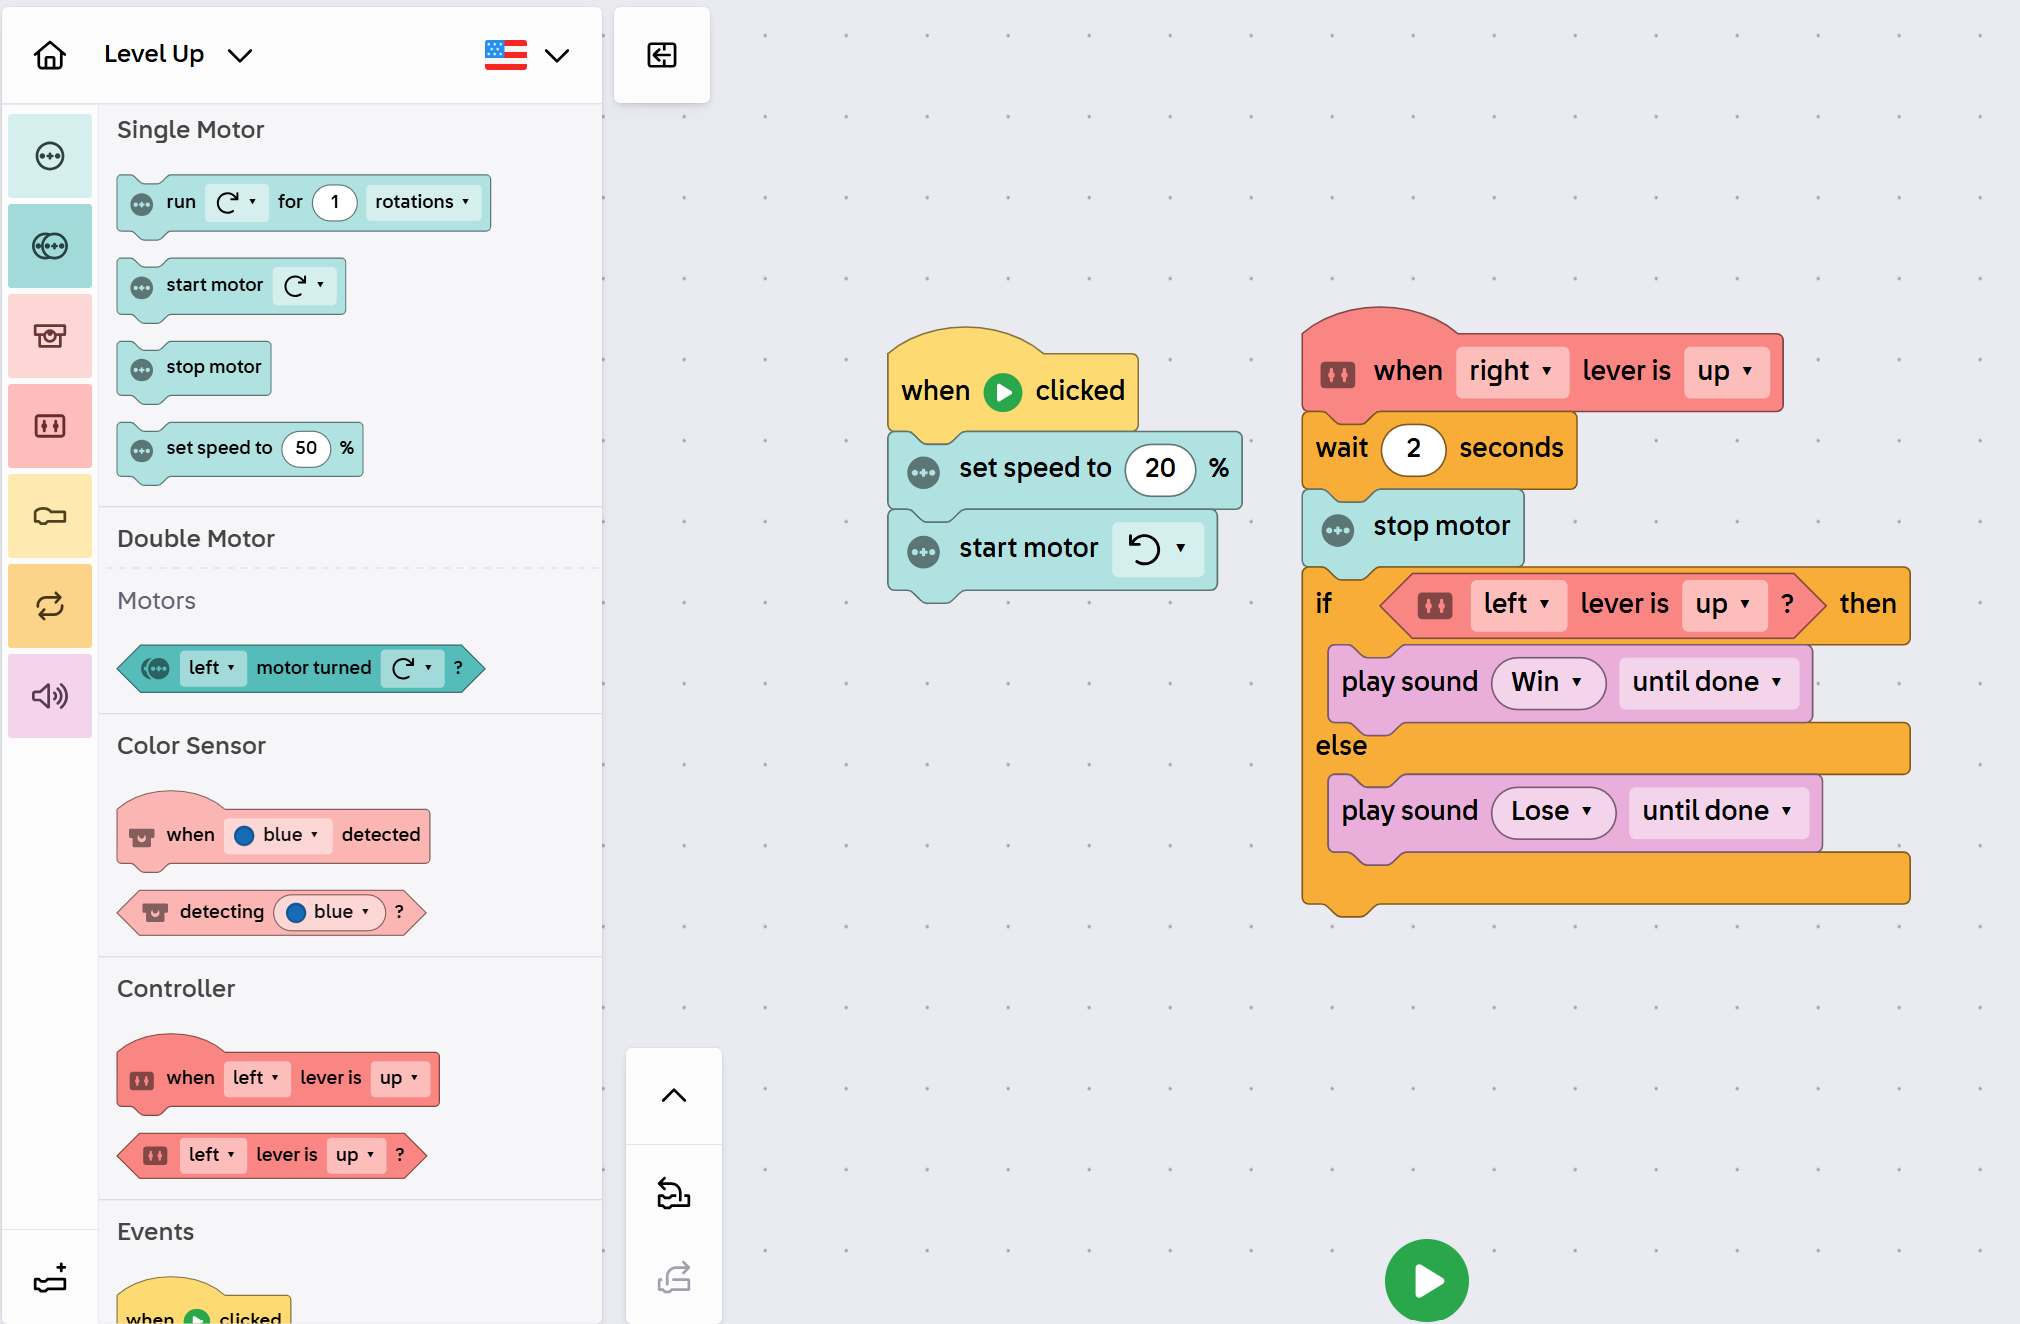
Notice the order. The right lever starts the check, and the left lever is the check. To win, your player has to hit both levers.
Try it
- 1Press Play. The red character moves slowly down the track to the controller. The lever moves, and after two seconds you hear the lose sound. The lever might even knock your character off!
- 2Slide the player back to the start line. Attach a brick so your character stays on the platform. Mr. Spratt made his character sit down.
- 3Press Play again. Your character reaches the controller, but only one lever moves. You lose again.
- 4Iterate: change your character’s build so it can hit both sides of the lever. It might be as easy as making your character stand up and put their arms up in the air.
- 5Press Play. When both levers get hit, you hear the win sound.
Careful
Clicking a code block runs it, so your motor may start moving.
Make a flowchart
A flowchart helps you plan out your program. On paper, start with the event: right lever up. Draw an arrow to the check: left lever up? Then draw two arrows out of the check, one for yes → win and one for anything else → lose.
Check it
With your character sitting, the game plays lose. With your character standing and arms up, it plays win. Your flowchart shows the same two paths.
The Challenge
Right now you have to slide your player back by hand, and only one obstacle has any code. Make the game reset itself when you lose, then turn the color sensor into a second obstacle.
Code it: return to start
Modify the program so if your character loses, the motor changes direction and takes the player back to the beginning of the game. Keep the win sound just as it is.
To test it, put your character in a sitting position so you lose no matter what. You’ll need someone at the computer to press Stop when the player gets back to the start.
Hint
Your new blocks go under else, after the lose sound. Which way does the motor need to spin to go back toward the start?
Build it better
Once the color sensor is coded, your red character will lose there, and the second obstacle might knock it right off. Rebuild your character so it pushes both levers and gets past the color sensor.
Hint
Think about what the color sensor will see as your character goes by. You have blue bricks and a blue minifigure to work with.
Code it: add the color sensor obstacle
One person creates obstacles using code. The other builds their character to make it through. Draw your flowchart first, then code it and test after each change.
- 1Keep going after a win. When the player wins at the controller, it should keep moving down the track to the next obstacle instead of stopping. In your flowchart, change win to continue.
- 2Add a reset lever. If the left lever is ever pulled down (backwards), the motor should run backwards toward the start. Now you can always reset the game just by pulling that lever.
- 3Code a color check. When the color sensor detects any color, use an if-then-else conditional. The player wins only if the sensor sees blue. Any other color plays the lose sound and sends the player back to the start.
- 4Give players a hint. Take the red brick off the start of your game and put a blue brick there. That’s a clue for the person playing your game.
- 5Test and iterate. Leave the red character on to make sure it loses. If you get the win sound, something went wrong along the way.
Hint
The color sensor needs its own event block, just like the right lever has. Look for when any color detected, and put a detecting blue? check inside the if.
Hint
You’ve made it pretty far by the color sensor, so the trip back is long. Set the motor speed higher, like 50%, before sending the player back.
You know it works when
A losing player plays the lose sound and drives back to the start. A blue character built to hit both levers makes it past the controller and the color sensor and plays the win sound.
Think About It
- 1What happened? What changed at the controller when your character went from sitting down to standing with its arms up? What did you change to get past the color sensor?
- 2Why? Why do you think the right lever is the event that starts everything, while the left lever is only the check?
- 3Real world: Think of an app, game, or machine you use. Where does it make an if-then-else choice based on what you do? Write it as “If ___, then ___, else ___.”
Lab book
Write how you used if-then-else conditionals to make your game more challenging. What was the conditional that kicked everything off, and what was the check to see if you continued or lost? For example: the color sensor seeing any color started the check. If it was blue, you won; else, you lost.
Share it: Leave a comment on the video. How did you use if-then-else conditionals to make your game more challenging?
Extension Challenge
Code from a flowchart
Mr. Spratt has a new flowchart for you. Code it, then build a character that can beat it:
- At the controller: if only the left lever is pushed forward, continue. If anything else is pushed, you lose.
- At the color sensor: it should not see any color. If it sees any color, you lose.
How could a character possibly get past a color sensor without being seen? Then go further: draw your own flowchart, code it, and challenge your partner to build a character that wins. You could even add spikes to your game.
Parent Overview
What we learned
An if-then-else conditional lets a program make a choice. If something is true, it does one thing; else, it does something different.
What we did
Your child built a live action video game from building instructions page 90: an S-shaped track where a minifigure rides a single motor past two obstacles to a finish flag. At code.legoeducation.com (PIN 1312), they ran starter code that checks whether the player pushed both controller levers, then rebuilt their character to win. They changed the code so a losing player drives back to the start, and added a color sensor obstacle that only lets a blue player through.
They’ve got it when you see
- They can point to a conditional in their code and tell you which part is the if, the then, and the else.
- The game plays win when both levers are pushed and lose when only one is.
- After a loss, the player drives itself back toward the start.
- Their flowchart matches what the game actually does.
If they’re stuck
- A device won’t show up when connecting: Click back, then next on the connection screen. In a classroom, make sure they scanned their own connection card.
- They lose every time at the controller: The character only reaches the right (bottom) lever. Have them build it taller, like standing with arms up.
- The player falls off: Attach the minifigure to the platform with a brick.
- The motor moves unexpectedly: Clicking a code block runs it. The player also won’t stop by itself at the start; someone needs to press Stop.
- The color sensor never reacts: Check that it’s in the very middle hole of its mount, facing the track.
Challenge answers
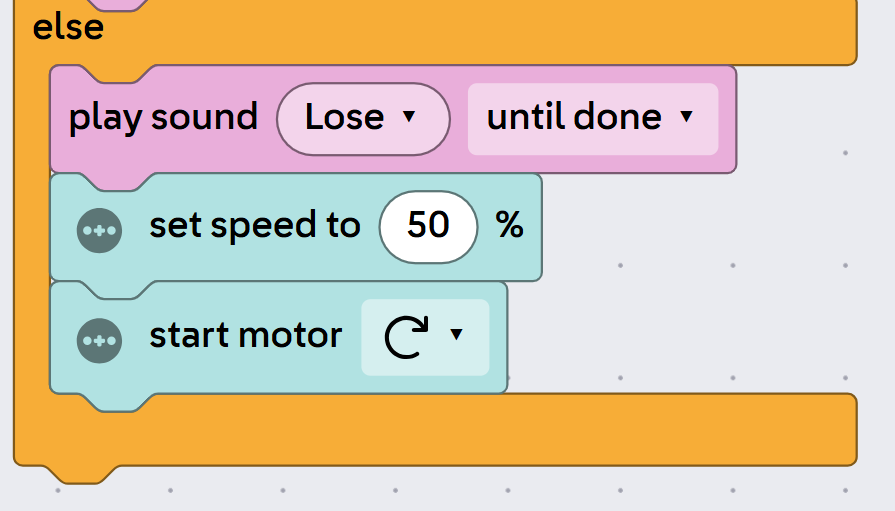
Return to start: Under else, after the lose sound, add two blocks.
| Block | What it does |
|---|---|
| set speed to 50% | Speeds up the trip back. |
| start motor ↻ | Runs the motor clockwise, back toward the start. |
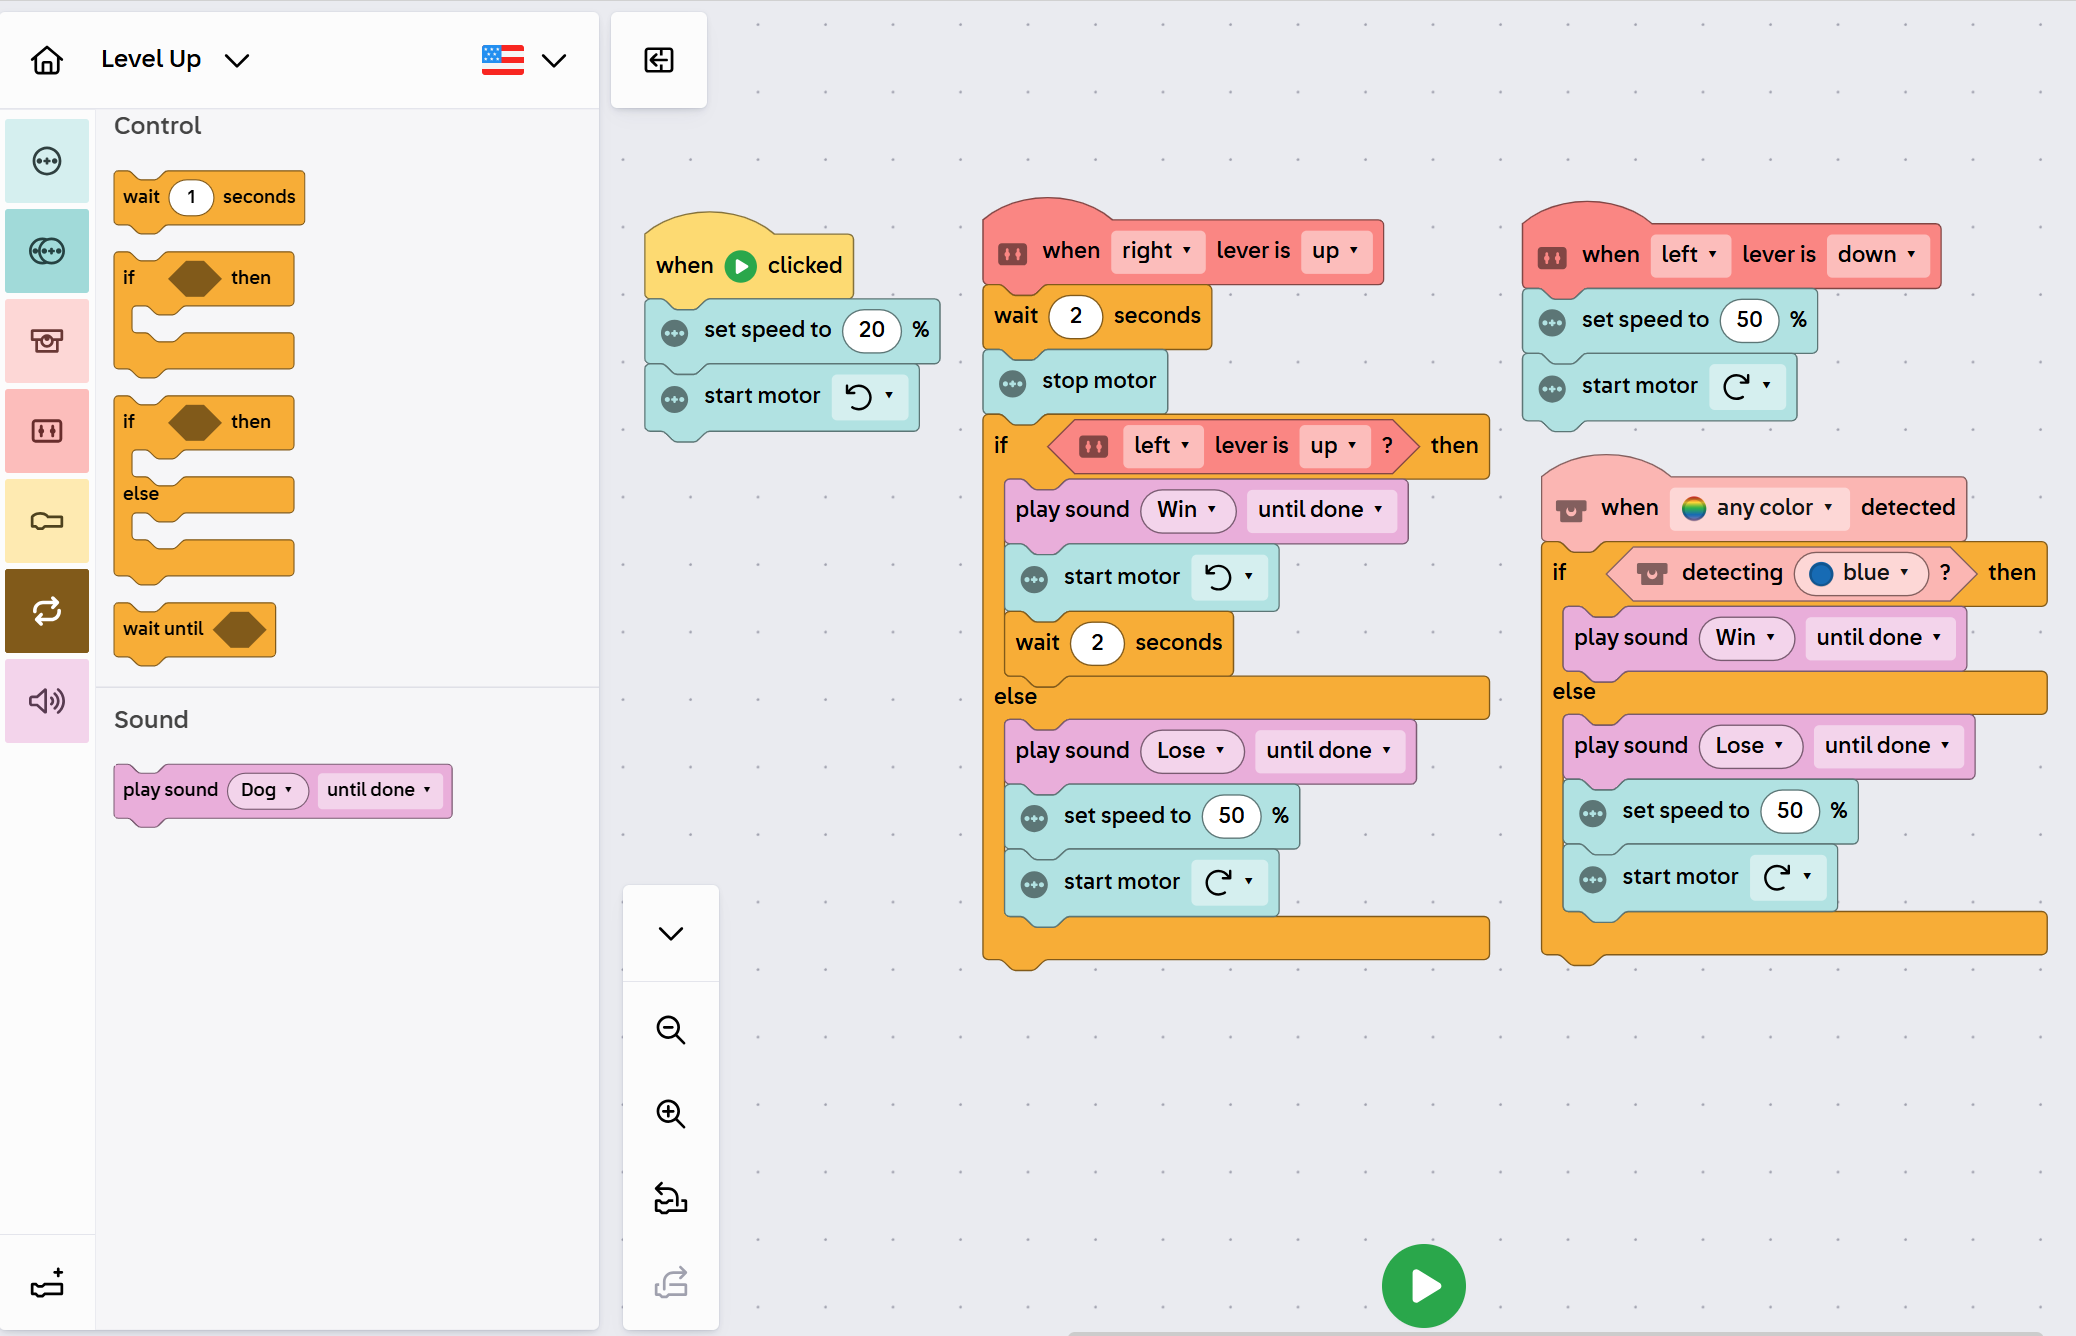
Color sensor obstacle: Here is the program from the video.
| Block | What it does |
|---|---|
| when ▶ clicked: set speed to 20%, start motor ↺ | Starts the player down the track. |
| when right lever is up: wait 2 seconds, stop motor | Stops the player at the controller. |
| if left lever is up? then | Both levers hit: |
| play sound Win, start motor ↺, wait 2 seconds | Plays win and keeps the player moving to the next obstacle. |
| else: play sound Lose, set speed to 50%, start motor ↻ | Plays lose and sends the player back to the start. |
| when left lever is down: set speed to 50%, start motor ↻ | Reset lever: sends the player back to the start any time. |
| when any color detected | Starts the color sensor check. |
| if detecting blue? then play sound Win | A blue character wins. |
| else: play sound Lose, set speed to 50%, start motor ↻ | Any other color loses and goes back to the start. |
- Build it better: A blue minifigure standing with arms up, built up with blue 2×4 bricks, hits both levers and shows blue to the color sensor. Any build that does both counts.
Standards connection
- CSTA 2-AP-12: Design and iteratively develop programs that combine control structures, including nested loops and compound conditionals.
- CSTA 2-AP-10: Use flowcharts and/or pseudocode to address complex problems as algorithms.
- CSTA 2-AP-17: Systematically test and refine programs using a range of test cases.
- NGSS MS-ETS1-4: Develop a model to generate data for iterative testing and modification of a proposed solution.