FLL Bioglow Week 7
FIRST LEGO League · Bioglow · Week 7
Compare Robot Designs and Drive Straight
How do you choose the best robot for the FIRST LEGO League Robot Game? The best way is to build, test, compare, and improve!
In this lesson, you will explore three different LEGO SPIKE Prime robot designs, program a robot to drive straight using the yaw sensor, and test each robot to decide which one works best for your team. Then, we will explore the rainforest understory and discover how this layer supports life throughout the rainforest.
Robot Design and the Judges' Presentation
Your robot design is an important part of FIRST LEGO League. During your five-minute robot design presentation, you will explain how your team designed, built, programmed, and improved your robot.
Your presentation should explain:
Robot and missions
Which robot did your team build, and which missions did you choose to complete?
Design
What makes your robot unique? Why did your team make those design choices?
Teamwork
How did your team work together to develop the robot and its code?
Creating
Did you improve an existing design or create your own?
Iteration
How did your team test your robot and make improvements throughout the season?
Remember: engineers don't expect their first design to be perfect. They use testing and feedback to make their designs better.
Meet Three Robot Designs
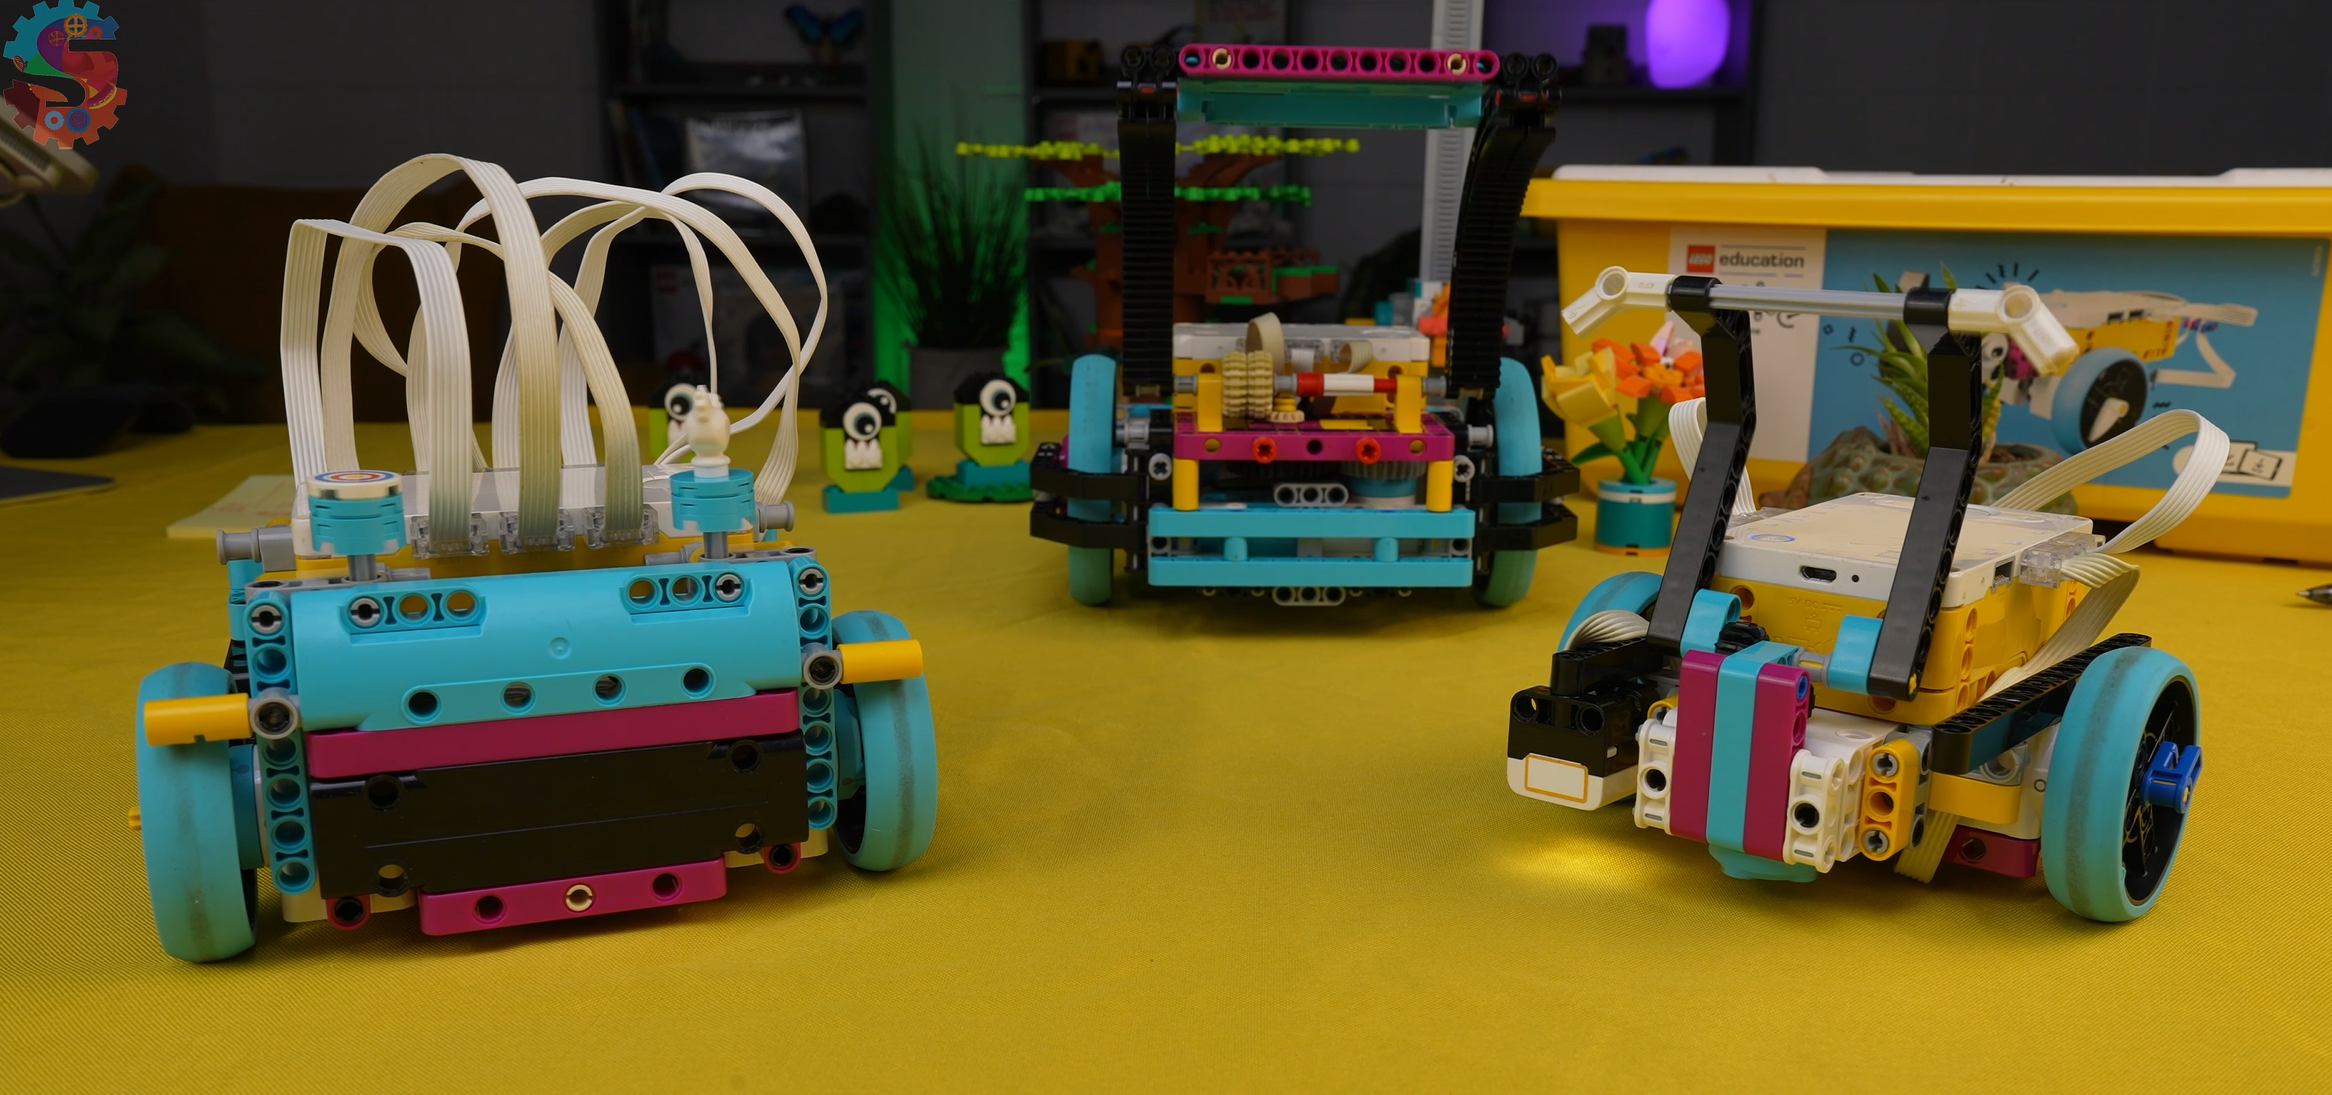
In this lesson, we explore three robot designs that have step-by-step building instructions available. You can use these designs as starting points for your own team's robot.
Driving Base 1
Driving Base 1 uses:
- Two medium motors to drive the robot.
- Small wheels.
- One large motor to operate an attachment.
- A color sensor.
- The hub is easy to access.
- Charging the hub is straightforward.
- Wire management is manageable.
- The attachment uses two small gears without a gearbox, so the gears may slip.
- The attachment has a more limited range of motion.
Advanced Driving Base
The Advanced Driving Base uses:
- Two large driving motors.
- Extra-large wheels.
- Two color sensors.
- Gearbox-based attachment systems.
- The design is symmetrical and securely assembled.
- Attachments can be swapped out quickly.
- Modular attachments can be reused on the front or back.
- You can build active attachments powered by motors or passive attachments that do not need a motor.
- The hub is difficult to access.
- Replacing a motor or fixing a wire can require substantial disassembly.
Droid Bot M
Droid Bot M uses:
- Two large motors for driving.
- Two small motors for gear attachments.
The building instructions at FLL Tutorials show you how to build an attachment and modify it later.
Building instructions (PDF)- It provides a starting point for teams interested in building and modifying attachments.
- You do not need the SPIKE Prime Expansion Set to build this robot.
- It may be better suited to teams with experience building arms and tools.
- You may need more than one SPIKE Prime kit to obtain the extra color sensor and large motor needed for the demonstrated setup.
Program Your Robot to Drive Straight Using the Yaw Sensor
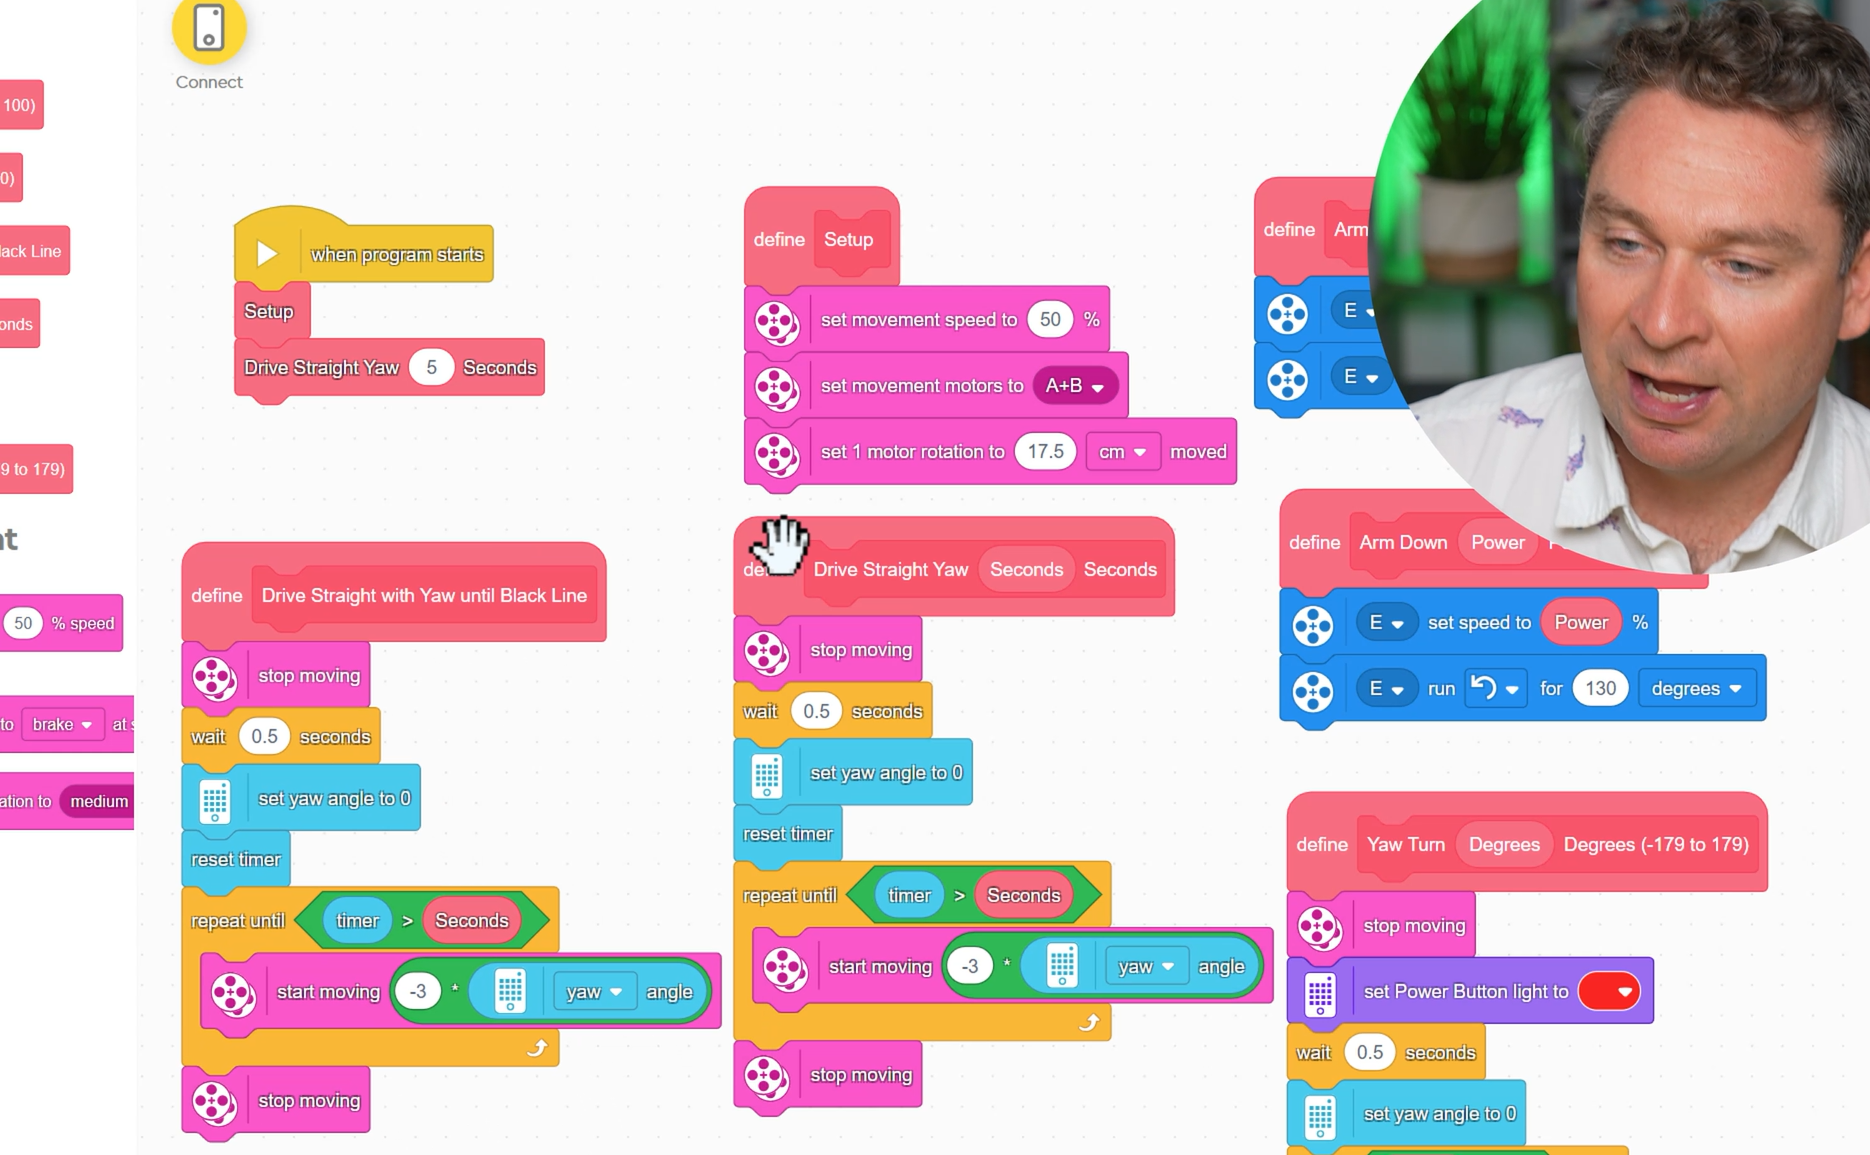
A robot may not travel in a perfectly straight line every time. The yaw sensor helps your program monitor the robot's heading and correct its direction as it moves. In this lesson, we create My Blocks.
Download the lesson code (SPIKE file)Setup
The Setup block prepares the robot before it begins moving. It should:
- 1Set the movement speed to 50%.
- 2Set the movement motors to match your robot.
- 3Configure the movement settings for your robot's wheels.
These settings may need to change when you switch to a different robot design.
Drive Straight with Yaw
This block allows you to tell your robot how many seconds to drive straight. The program follows these steps:
- 1Stop the robot completely.
- 2Wait half a second so the robot can settle.
- 3Reset the yaw angle to zero.
- 4Reset the timer.
- 5Start moving forward.
- 6Repeatedly check the yaw angle and adjust the robot's steering.
- 7Continue until the timer reaches the requested number of seconds.
- 8Stop moving.
The example uses a steering adjustment calculated by multiplying the yaw angle by -3. You can experiment with this value to see how it affects your robot's movement.
Why use a loop?
The robot needs to keep checking its yaw angle while it moves. If the program only checked once, it would not continue correcting its heading as the robot moved.
Drive Straight Until Black Line
Now modify your program so the robot drives forward until a color sensor detects a black line. The program follows these steps:
- 1Set up the robot.
- 2Reset the yaw angle and timer.
- 3Begin moving forward while correcting the heading.
- 4Continue until either color sensor detects black.
- 5Stop the robot.
In the demonstrated program, the color sensors are Sensor C and Sensor E. Your sensor ports may be different depending on your robot.
Important
The yaw sensor helps the robot maintain its heading. The color sensor detects the black line and tells the robot when to stop.
Test and Compare Your Robot Designs
Now it is time to test your robots! A fair test gives each robot the same task under the same conditions. Use the following five tests to compare your designs. Give each robot a score from 1 to 5, with 5 being the best.
Print the robot comparison tests (PDF)Drive Straight
Program the robot to drive straight and repeat the test several times.
- Does it veer off to one side?
- Does it follow a similar path each time?
- Do any wires get caught or drag on the floor?
Turn Accurately
Program the robot to turn left 90 degrees and then right 90 degrees.
- Does it make accurate turns?
- Does it consistently turn too far or not far enough?
- Are the results similar each time?
Square Up Against a Wall
Look at the shape of your robot. Does it have a flat, square side that can be aligned against a wall? Many successful Robot Game strategies involve squaring the robot against a wall before starting a run. This helps the team position the robot consistently instead of estimating its position by eye.
- Can your robot line up against a wall?
- Does it sit straight and evenly when aligned?
- Can your team repeat the same starting position?
Attachments
Consider how easily you can build and change attachments.
- Can your robot complete different missions using different attachments?
- Can you create active and passive attachments?
- Do attachments lock securely into place?
- Can you reuse attachments on the front or back?
Hub Accessibility
Your robot's hub needs to remain accessible.
- Can you easily reach the charging port?
- Can you access the battery when necessary?
- Can you reach the hub's power button?
- Would you need to disassemble your robot to fix a problem?
A robot that is difficult to charge or repair can create unnecessary problems during a competition.
Robot Design Scorecard
Use this table to record your results.
| Test | Driving Base 1 | Advanced Driving Base | Droid Bot M |
|---|---|---|---|
| 1. Drive straight | ___ / 5 | ___ / 5 | ___ / 5 |
| 2. Turn accurately | ___ / 5 | ___ / 5 | ___ / 5 |
| 3. Square against a wall | ___ / 5 | ___ / 5 | ___ / 5 |
| 4. Attachments | ___ / 5 | ___ / 5 | ___ / 5 |
| 5. Hub accessibility | ___ / 5 | ___ / 5 | ___ / 5 |
| Total | ___ / 25 | ___ / 25 | ___ / 25 |
Test each robot more than once before deciding which design is best. You can also use this scorecard to compare robots your own team has built.
Can you bring more than one robot to a competition?
Teams may bring more than one robot to the event. However, only one robot and one hub can be used during a Robot Game match. You must use the same hub that you place on the table at the beginning of the two-and-a-half-minute match.
Your team should decide which robot to use based on its performance, reliability, and ability to complete your chosen missions.
Rainforest Research: The Understory
Now let's explore the rainforest!
What is the understory?
The understory is the shaded vegetation layer beneath the rainforest canopy. It contains young trees, shrubs, vines, ferns, and other plants that have adapted to limited sunlight.
Think about plants you might grow at home that prefer shade. Some of those plants may have adaptations that help them survive in the understory.
What lives in the understory?
Depending on the rainforest, the understory can be home to:
- Insects and spiders
- Frogs and lizards
- Snakes
- Birds
- Mammals
Some animals move between different rainforest layers during the day or throughout their lives. The rainforest is a connected ecosystem, and its organisms do not always stay in just one layer.
What can we learn from the understory?
- Plant adaptations: How plants survive with limited sunlight.
- Food and shelter: How animals find the resources they need.
- Forest regeneration: How young trees grow and replace older trees.
- Ecosystem relationships: How different organisms interact with one another.
Connecting the understory to the Innovation Project
Our Bioglow Innovation Project explores propagating new plants and native species to help revitalize an ecosystem.
When choosing plants to propagate, we need to consider where they will grow. If we want to plant species beneath the canopy, we need to understand which plants can survive in shaded conditions.
Researching the understory helps us think carefully about which plants might thrive in a particular environment.
Reflection question
If the rainforest canopy disappeared, how might that change the understory?
Consider how changes in sunlight could affect plants, animals, and the relationships between living things.
Final Challenge: Test, Learn, and Improve
Before finishing this lesson, make sure you have completed the following tasks.
- Explore all three robot designs.
- Create a Setup My Block for your robot.
- Create a Drive Straight with Yaw My Block.
- Create a Drive Straight Until Black Line My Block.
- Test and score the three robot designs.
- Discuss which robot your team wants to use and why.
- Learn about the rainforest understory.
- Answer the reflection question about what would happen if the canopy disappeared.
- Save your program so you can reuse your My Blocks in future lessons.
As you prepare for your FIRST LEGO League competition, remember that great engineering comes from testing ideas, learning from mistakes, and making improvements.
Leave a comment
Which robot design would you choose for your team, and what evidence from your tests supports your decision?